

🎃 Bloody Broken Glass Cupcakes: The Ultimate Halloween Treat
Halloween is the time to embrace all things spooky, sweet, and downright creepy. If you’re hunting for a showstopping dessert that terrifies and delights, look no further than Bloody Broken Glass Cupcakes. These gory goodies are as fun to make as they are to eat.
With edible sugar glass, oozing fake blood, and moist cupcakes underneath, this gruesome dessert is the perfect centerpiece for any haunted gathering. In this guide, you’ll learn exactly how to make them, plus tips on safety, presentation, and customization.
🧁 What Are Bloody Broken Glass Cupcakes?
Bloody Broken Glass Cupcakes are Halloween-themed cupcakes topped with shards of edible glass and drizzled with realistic-looking fake blood. The combination of sweet vanilla or chocolate cake with gruesome toppers gives the illusion of shattered glass impaling a blood-soaked treat — perfect for horror movie fans or Halloween partygoers.
These cupcakes exploded in popularity thanks to social media platforms like TikTok and Instagram. Their dramatic visuals and simple assembly make them ideal for both amateur bakers and seasoned decorators.
Want to master the trick to making glass you can eat (and won’t actually cut anyone)? Here’s a safe and easy way to make it using this edible sugar glass tutorial from Instructables.
🩸 The Inspiration Behind This Creepy Treat
The idea behind bloody cupcakes is to mimic the aesthetic of a horror film — without the actual horror. Think classic slasher films, crime scenes, or vampire bites all represented in cupcake form. It’s macabre, it’s delicious, and it gets people talking.
Even if you’re not a pro at decorating, this cupcake is forgiving. Splatter too much blood? Even better! Want to make the “glass” jagged and uneven? Perfect. That chaotic realism is what makes this dessert so eerily effective.
- 5 ingredients
- No mixer required
- Ready in under an hour
- Perfectly sweet and tart balance
And if you love no-fuss baking, you’ll also enjoy this easy and delicious No-Bake Peanut Butter Pie — another fast dessert that’s great for gatherings.
Need ideas for food-safe fake blood? Check out this fake blood guide to find one that suits your ingredients and safety needs.
🧁 Ingredients You’ll Need
Making Bloody Broken Glass Cupcakes may look terrifying, but the ingredients are actually very simple. You’ll be combining basic baking staples with creative Halloween-themed components like edible sugar glass and homemade fake blood. Below is everything you need to bring these spooky treats to life.
🎂 For the Cupcake Base
You can use your favorite cupcake recipe or a store-bought mix to save time. Popular base flavors for this cupcake include red velvet, vanilla, or black cocoa chocolate — all of which contrast beautifully with the white frosting and red “blood.”
Basic Vanilla Cupcake Ingredients:
- 1 box of white cake mix (or 2 cups of homemade vanilla cupcake batter)
- 1 cup of water
- ⅓ cup of vegetable oil
- 3 large eggs
- 1 tsp vanilla extract (optional for enhanced flavor)
Want a darker, more dramatic look? Use black cocoa powder for a jet-black cupcake base that really pops under the glass shards.
🍬 For the Edible Sugar Glass
This is the highlight of your cupcake design — the shattered glass effect. It’s made with just a few ingredients but requires precision.
Ingredients for Sugar Glass:
- 2 cups of granulated sugar
- 1 cup of water
- 1 cup of light corn syrup
- ¼ tsp cream of tartar (optional, to prevent crystallization)
You’ll also need a candy thermometer to monitor the sugar as it cooks to the “hard crack” stage (300°F / 149°C).
🩸 For the Fake Blood
Your cupcakes wouldn’t be bloody without a convincing drizzle of red goo. There are several options depending on whether you want a natural, homemade, or store-bought solution.
Option 1: Homemade Fake Blood (Classic)
- ½ cup light corn syrup
- Red food coloring
- 1–2 drops of blue food coloring (for depth)
- 1 tsp water (optional to thin)
Option 2: Natural Jam-Based Blood
- 3 tbsp strawberry or raspberry jam
- 1 tsp water to thin
- (Optional) Sieve to remove seeds for smoother consistency
Option 3: Store-Bought Shortcut
- Red gel decorating icing or glaze
Pro Tip: Add a touch of chocolate syrup or cocoa powder to deepen the blood color and make it more realistic.
❄️ Optional Add-Ins
- Red gel or jam filling (for bloody centers)
- Cream cheese or vanilla buttercream frosting
- Plastic syringes or pipettes (for dramatic effect)
- Halloween-themed cupcake liners
These ingredients will not only make your cupcakes taste amazing but also help them stand out visually. Think gory, delicious, and unforgettable.
Want a flavor twist? Swap the filling for cherry or try the method in these Cherry Cobbler Muffins for a portable version!
🔪 Step-by-Step: How to Make Bloody Broken Glass Cupcakes

Making Bloody Broken Glass Cupcakes may look like a bakery-level horror scene, but it’s totally doable at home. Here’s a detailed, beginner-friendly guide to bake, decorate, and gore-ify your cupcakes to perfection.
🎂 Step 1: Bake the Cupcake Base
Start with your chosen cupcake flavor — vanilla, red velvet, or black cocoa chocolate. You can use a store-bought cake mix or your favorite homemade recipe.
Instructions:
- Preheat your oven to 350°F (175°C).
- Line a cupcake tray with Halloween-themed cupcake liners.
- Prepare the batter (from mix or scratch) and fill each liner about ⅔ full.
- Bake for 18–22 minutes or until a toothpick comes out clean.
- Let cupcakes cool completely before decorating.
Tip: Use red velvet for a naturally bloody look when bitten into!
🍬 Step 2: Make the Edible Sugar Glass
This creates the “broken glass” effect — visually stunning and totally edible!
Instructions:
- In a heavy-bottomed saucepan, combine:
- 2 cups sugar
- 1 cup water
- 1 cup light corn syrup
- Stir gently over medium heat until sugar dissolves.
- Insert a candy thermometer and heat the mixture to 300°F (hard crack stage).
- Pour onto a parchment- or silicone-lined baking sheet.
- Let cool completely (about 1 hour), then break into shards using a rolling pin or the back of a spoon.
Warning: Sugar gets extremely hot. Handle with care!
🩸 Step 3: Prepare the Fake Blood
Choose your style — jam-based for natural, or corn syrup-based for theatrical.
Quick Blood Recipe:
- Mix ½ cup corn syrup with red food coloring.
- Add 1–2 drops of blue to darken the tone.
- Thin with water if needed.
Pro Tip: For realistic blood, use a mix of jam and syrup for both color and texture.
🧁 Step 4: Assemble the Cupcakes
Now, the fun (and creepy) part!
Instructions:
- Frost cooled cupcakes with white or cream-colored frosting.
- Gently insert sugar glass shards into the frosting at various angles.
- Drizzle or splatter fake blood over the tops and sides.
- For dramatic flair, insert pipettes filled with blood into each cupcake.
Optional: Add a jam filling for an oozing “stab wound” effect when bitten.
👻 Decoration Tips for Realistic Gore
To make your bloody cupcakes truly unsettling:
- Use a toothbrush to splatter fake blood across the cupcakes for a crime-scene effect.
- Drizzle fake blood just around the base of the glass for a stabbing illusion.
- Apply blood to cupcake liners for added realism.
- Add edible eyeballs or mini syringes as toppers for more horror fun.
🧪 Flavor Variations to Try
You can personalize your cupcakes to match your party theme or personal taste:
- Red Velvet Cupcakes + cream cheese frosting + cherry filling
- Pumpkin Spice Cupcakes + vanilla frosting + cinnamon sugar glass
- Chocolate Cupcakes + raspberry jam center + ganache topping
- Vegan or Gluten-Free options using alternative flours or egg replacers
Want to go over the top? Add a bloody filling inside each cupcake that oozes when bitten into!
📦 Make-Ahead & Storage Tips
Good news: these cupcakes hold up well!
- Cupcakes: Bake up to 2 days ahead; store in an airtight container.
- Edible glass: Make a day or two before use. Keep dry to prevent melting.
- Fake blood: Store in fridge for up to 5 days. Reheat or stir before using.
Avoid adding the glass and blood until the day of serving to keep everything looking sharp and fresh.
⚠️ Sugar Glass Safety Tips
Even though sugar glass is technically edible, it can be hard and sharp. Keep these safety tips in mind:
- Avoid giving to small children or toddlers
- Don’t use actual glass for decoration!
- Soften edges slightly if needed with a damp cloth
For a safer version, try gelatin glass or plastic candy toppers that mimic the look.
🎉 Serving Suggestions for Maximum Spookiness
Take your Halloween dessert table to the next level:
- Arrange cupcakes on a dark black tray with red lighting or candles.
- Serve alongside witches’ brew punch, bloody cocktails, or vampire mocktails.
- Display with other horror-themed desserts like brain-shaped Jell-O or severed finger cookies.
Want some inspiration for your spooky party spread? Check out these Halloween dessert table ideas to complete your haunted setup.
❓ Frequently Asked Questions (FAQs)
How do I make edible sugar glass?
Combine sugar, water, and corn syrup, then heat to 300°F. Pour onto a lined tray, let harden, and break into shards.
Can I use store-bought cake mix?
Absolutely! Boxed cake mix saves time and still tastes great — especially when dressed up with spooky toppings.
What’s the best recipe for fake blood?
Try corn syrup + red food coloring + a small drop of blue. Or go natural with thinned raspberry or strawberry jam.
Are broken glass cupcakes safe for kids?
Use caution — sugar glass can be hard. Consider softer decorations for children under 8.
Can I make these cupcakes ahead of time?
Yes! Bake cupcakes and make decorations a day or two before. Assemble just before serving for best results.
Can I skip the sugar glass?
Yes, substitute with:
- Clear candy shards
- Gelatin “glass”
- Plastic Halloween toppers
How do I store leftovers?
Keep in the fridge, especially if using perishable ingredients like cream cheese frosting or jam filling.
🧁 Final Bites: Why You’ll Love Bloody Broken Glass Cupcakes

Whether you’re hosting a haunted house party, planning a scary movie night, or just looking for an Instagram-worthy treat, Bloody Broken Glass Cupcakes are an absolute must-bake. They’re creative, shocking, and deliciously eerie.
From the shattered sugar glass to the oozing blood detail, this is one Halloween dessert that doesn’t just sit on the table — it screams for attention.
So roll up your sleeves, heat that sugar, and prepare to bake something both terrifying and sweet. Because this October, your cupcakes aren’t just treats… they’re a murderous masterpiece.
Strawberry Dump Cake – The Ultimate Easy Dessert Guide
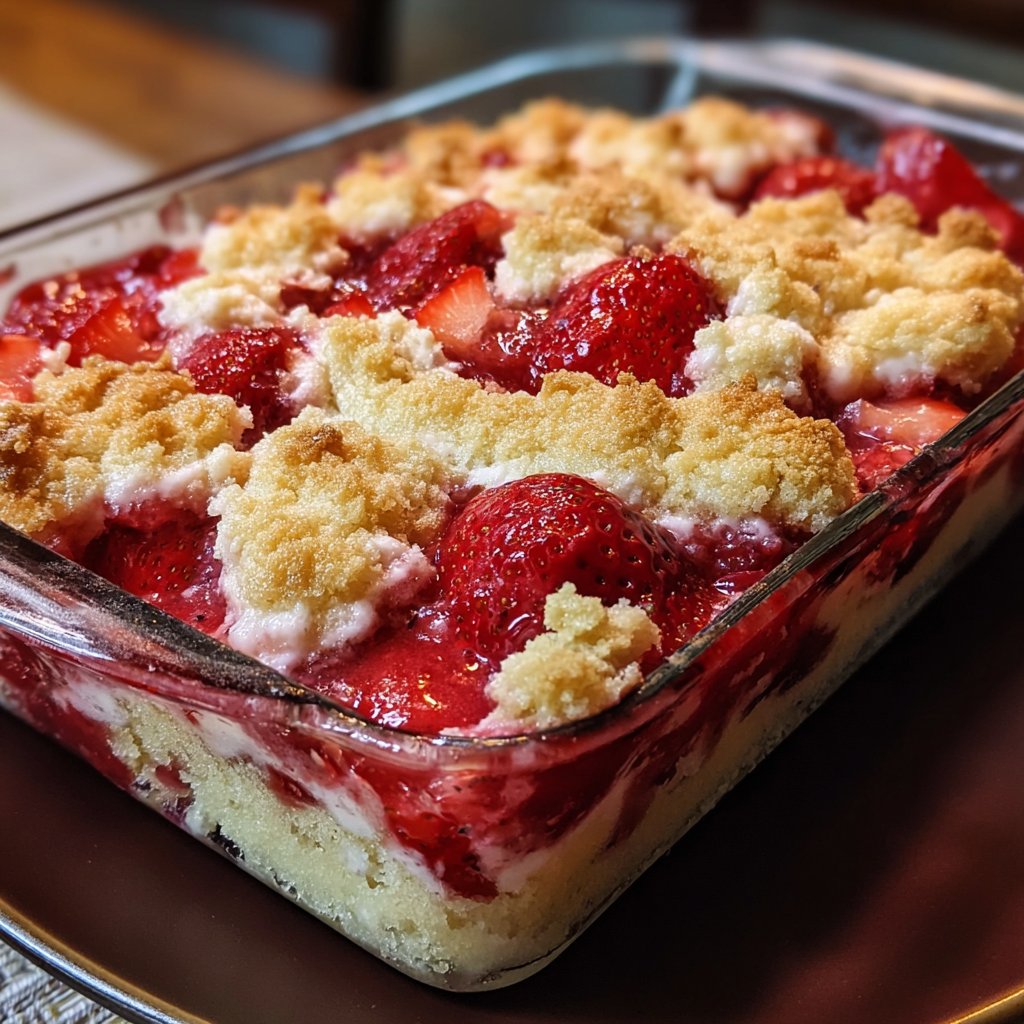
If you’re looking for a dessert that’s both easy and delicious, few recipes compare to the classic Strawberry Dump Cake. This simple treat has become a favorite for busy home bakers who want maximum flavor with minimal effort. Using just a handful of ingredients—often as few as three—you can whip up a dessert that tastes like it took hours.
But what exactly makes dump cake so popular? It comes down to its no-fuss preparation, the versatility of variations, and the natural sweetness of strawberries. This guide will walk you through everything you need to know about making the perfect Strawberry Dump Cake—from ingredients and step-by-step instructions to serving ideas, troubleshooting, and even dietary adaptations.
And if you’re curious about the nutritional benefits of strawberries, you’ll be pleased to know they are naturally high in vitamin C, antioxidants, and fiber (Healthline – Strawberry Nutrition). That means your dessert not only satisfies your sweet tooth but also brings along some health perks.
Interestingly, the dump cake itself has a quirky backstory. Unlike cobblers or crisps, dump cakes became popular in mid-20th century America when boxed cake mixes gained traction. The idea was simple—dump, bake, and enjoy. If you want to read more about the origins of this dessert, check out the Wikipedia history of dump cake.
Ingredients for Strawberry Dump Cake
Creating a perfect Strawberry Dump Cake starts with understanding your ingredients. Although the recipe is famously simple, each component plays a crucial role in delivering a dessert that is sweet, juicy, and buttery. Using 500 g of strawberries as a base ensures a balance between fruitiness and sweetness, creating a dessert that is both flavorful and visually appealing.
1. Strawberries – 500 g
The star of this dessert is, of course, the strawberries. Using 500 g of fresh or frozen strawberries provides the perfect balance of sweetness and juiciness. Fresh strawberries are ideal during their peak season, as they deliver vibrant color and natural sweetness. If you use frozen strawberries, make sure to thaw them and drain any excess liquid to avoid a watery cake. Strawberries provide the moist base that contrasts beautifully with the crumbly cake topping, creating the signature texture of a dump cake.
2. Granulated Sugar – 100 g
Although strawberries are naturally sweet, adding 100 g of granulated sugar ensures a well-balanced flavor, especially if the fruit is slightly tart. Sugar not only sweetens but also helps the strawberries release their juices during baking, contributing to the dessert’s luscious syrupy texture. For a healthier alternative, you can reduce the sugar slightly or use a natural sweetener, but keep in mind this will affect the caramelization and overall sweetness.
3. Yellow Cake Mix – 1 Box (≈200 g)
The yellow cake mix is the key ingredient that transforms this fruit base into a dessert. By sprinkling the dry mix over the strawberries, you create a golden, buttery topping once baked. You can also experiment with white or strawberry cake mix for a flavor twist. The cake mix requires no mixing with the fruit, which preserves the layers and ensures a contrast between the soft, juicy strawberries and the crisp cake topping.
4. Butter – 115 g, Melted
Melted butter is poured over the cake mix before baking. This ingredient is essential because it allows the dry cake mix to form a crispy, golden crust. The butter seeps through the mix during baking, creating pockets of rich flavor and a slightly caramelized texture. Using high-quality unsalted butter enhances the taste, but you can also use salted butter if preferred, reducing the need for additional salt.
5. Vanilla Extract – 1 tsp (Optional)
Adding vanilla extract is optional but highly recommended. It enhances the natural flavors of the strawberries and cake, giving the dessert a subtle aromatic depth. Vanilla complements the sweetness and adds a touch of sophistication to an otherwise simple dessert.
Optional Add-Ins
- Cinnamon or nutmeg – adds warmth and spice for a cozy flavor.
- Whipped cream or vanilla ice cream – perfect for serving, enhancing both taste and presentation.
- Extra fresh strawberries – for garnish, adding color and freshness.
Notes on Ingredient Preparation
- Layering is key: place strawberries first, sprinkle the cake mix on top, and pour melted butter evenly.
- Avoid stirring to maintain the distinct layers that give a dump cake its unique texture.
- Use high-quality ingredients for the best flavor; simple adjustments can transform this dessert from good to exceptional.
By understanding the role of each ingredient, you can make a Strawberry Dump Cake that’s perfectly balanced, rich in flavor, and delightfully easy to prepare.
Step-by-Step Instructions

Making a Strawberry Dump Cake is delightfully simple, which is why it’s a favorite for both beginner and seasoned bakers. The magic of this dessert lies in its layered simplicity: juicy strawberries form the base, a dry cake mix creates a golden topping, and melted butter binds it all together. Here’s a detailed, step-by-step guide to make a perfect Strawberry Dump Cake using 500 g of strawberries.
1. Preheat Your Oven
Begin by preheating your oven to 350°F (175°C). A properly preheated oven ensures even cooking and a golden, crispy top. Meanwhile, prepare your baking dish with a light coating of butter or nonstick spray to prevent sticking and make cleanup easier.
2. Prepare the Strawberries
Place the 500 g of fresh or thawed frozen strawberries in a medium bowl. Sprinkle 100 g of granulated sugar evenly over the fruit and add 1 tsp of vanilla extract if desired. Gently toss to coat the strawberries, taking care not to mash them. The sugar will help the fruit release its juices during baking, creating a naturally sweet syrup that soaks into the cake layers.
3. Layer the Fruit
Pour the prepared strawberries into your greased baking dish, spreading them evenly to cover the bottom. This ensures that every slice of cake has a good portion of juicy strawberries.
4. Add the Cake Mix
Sprinkle the yellow cake mix (≈200 g) evenly over the strawberries. Do not stir—the layers should remain separate to create the classic dump cake texture. For added flavor, you can gently mix in cinnamon or nutmeg into the dry cake mix before sprinkling it over the fruit.
5. Pour the Melted Butter
Evenly drizzle 115 g of melted butter over the cake mix. The butter will melt during baking, creating a crispy, golden crust and enhancing the rich flavor of the cake. For a more indulgent version, you can also add small pats of butter instead of pouring, which creates pockets of buttery goodness.
6. Bake to Perfection
Place the baking dish in the preheated oven and bake for 45–50 minutes, or until the top is golden brown and bubbling around the edges. The aroma of baked strawberries and buttery cake should fill your kitchen—a sign that it’s nearly ready.
7. Cool and Serve
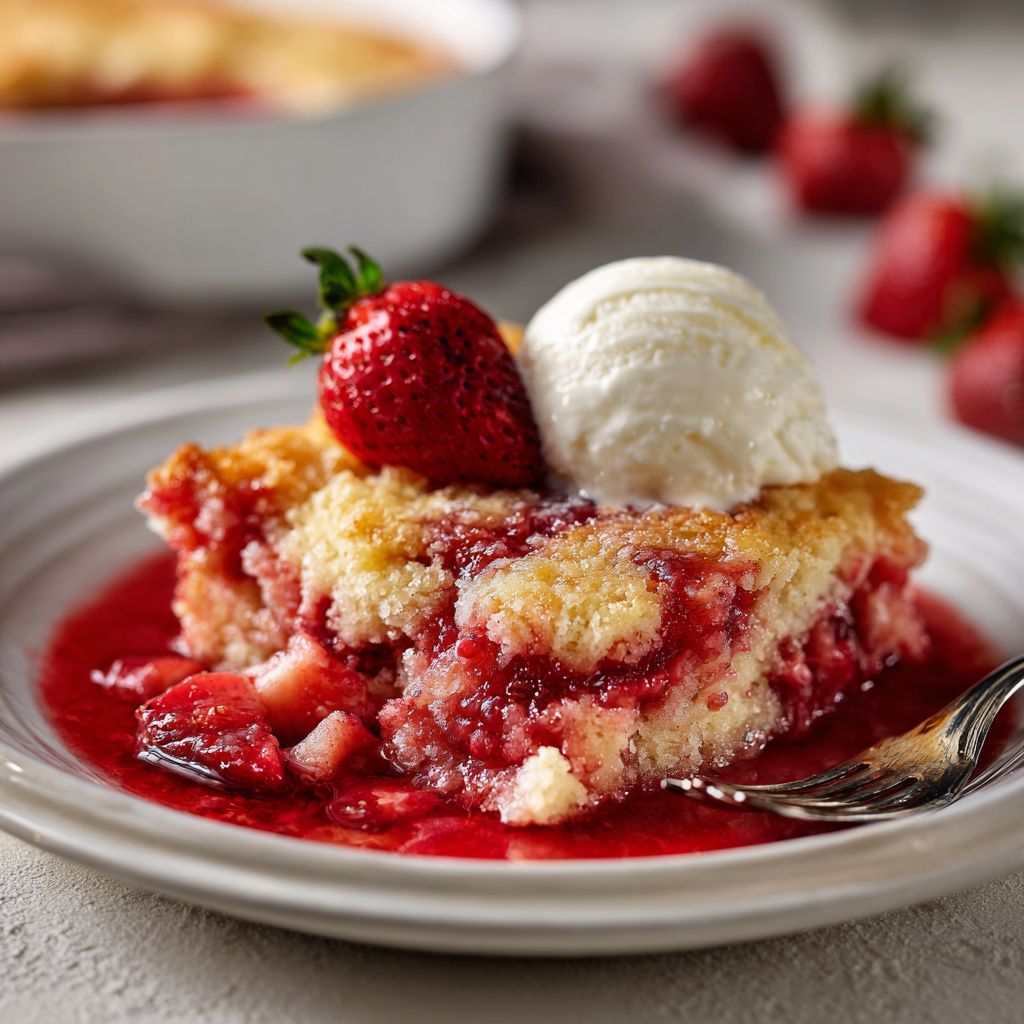
Allow the cake to cool for at least 10 minutes before serving. This helps the juices set slightly while keeping the topping crisp. Serve warm with whipped cream or vanilla ice cream, and garnish with fresh strawberries for an extra touch of freshness and color.
Tips for the Best Results
- Avoid stirring at any point; the distinct layers are key to the dessert’s texture.
- If using frozen strawberries, drain excess liquid to prevent soggy cake.
- For extra flavor, consider adding a splash of lemon juice to the strawberries.
- Leftovers can be stored in the refrigerator for up to 3 days; reheat before serving.
Variations
- Strawberry Cheesecake Dump Cake: Add a layer of cream cheese under the cake mix.
- Chocolate Strawberry Dump Cake: Swap yellow cake mix with chocolate cake mix.
- Mixed Berry Dump Cake: Combine strawberries with blueberries and raspberries for a summer twist.
By following these steps, you’ll have a Strawberry Dump Cake that is juicy, buttery, and perfectly textured every time. The combination of sweet strawberries, crispy cake topping, and rich butter flavor makes this dessert a guaranteed crowd-pleaser.
Tip: Avoid stirring. The magic happens when the cake mix and butter melt into the fruit.
Variations of Strawberry Dump Cake
The base recipe is versatile. You can create exciting versions to fit your taste or occasion.
- Strawberry Cheesecake Dump Cake: Add dollops of sweetened cream cheese before baking.
- Strawberry Pineapple Dump Cake: Combine pineapple chunks with the strawberry layer.
- Strawberry with Chocolate Cake Mix: Swap yellow cake for chocolate cake mix for a “chocolate-covered strawberry” vibe.
- Strawberry Rhubarb Dump Cake: Balance sweetness with tart rhubarb.
- Strawberry Shortcake Style: Use white cake mix and top with whipped cream and fresh berries after baking.
- Strawberry Cheesecake Dump Cake: Add dollops of sweetened cream cheese before baking—similar to indulgent treats like fried strawberry cheesecake sandwiches.
For more strawberry-themed creations, you might also enjoy this decadent strawberry crunch cheesecake.
Serving Suggestions
The beauty of Strawberry Dump Cake is in how you serve it.
- Serve warm with vanilla ice cream for a gooey contrast.
- Add whipped cream for lightness.
- Dust with powdered sugar for a bakery-style look.
- Pair with hot coffee or cold milk for comfort.
- Serve warm with vanilla ice cream for a gooey contrast, just like combining cake and cream in desserts such as oreo ice cream cake.
Storage and Make-Ahead Tips
- Refrigerator: Store covered for up to 4 days.
- Freezer: Wrap tightly in foil or freezer bags; keeps for 2–3 months.
- Reheat: Warm individual portions in the microwave or reheat in the oven at 300°F for 15 minutes.
Strawberry Dump Cake with Different Mixes
Different cake mixes can change the flavor dramatically:
- Yellow cake mix: Classic buttery flavor.
- White cake mix: Lighter, more neutral—lets strawberry flavor shine.
- Strawberry cake mix: Intensifies the fruity flavor.
- Gluten-free cake mix: Perfect for those with gluten sensitivity.
- Sugar-free cake mix: For a lighter version.
Other cake mix desserts worth exploring include the classic oreo dirt cake, which shares the same “easy-mix” concept.
Strawberry Dump Cake for Special Diets
- Gluten-free: Use a certified gluten-free cake mix.
- Vegan: Replace butter with vegan margarine or coconut oil.
- Low-sugar: Use sugar-free pie filling and a light cake mix.
Troubleshooting Common Mistakes
Even easy recipes can go wrong. Here’s how to fix them:
- Powdery top: Add extra butter slices or drizzle melted butter evenly.
- Runny fruit layer: Use less fresh fruit liquid or add cornstarch to strawberries.
- Burnt edges: Lower oven rack and cover edges with foil.
- Soggy center: Let it cool for 15–20 minutes before serving.
If you enjoy experimenting with fruit-based cakes, you might also try the apple fritter cake for a spiced, cozy twist.
Health and Nutrition Facts
On average, a serving of Strawberry Dump Cake (1/12 of a 9×13 pan) contains:
- Calories: 280–350
- Sugar: 25–35g
- Fat: 12–15g
- Carbs: 40–45g
You can lighten it up by using sugar-free pie filling, a light cake mix, or butter substitutes.
FAQs
Can you use fresh strawberries instead of canned pie filling?
Yes, but add sugar and a tablespoon of cornstarch to thicken the juices.
How do you keep dump cake from being runny?
Drain excess liquid from fresh or frozen fruit, or bake a little longer.
Do you stir dump cake after layering?
No—leave the layers as is. Stirring changes the texture.
Can dump cake be made ahead of time?
Yes, bake it the night before and refrigerate. Reheat before serving.
What’s the difference between dump cake and cobbler?
Cobbler uses a biscuit or batter topping, while dump cake uses cake mix.
How do you reheat dump cake?
Reheat in the oven for best texture, or microwave for a quick fix.
Can you freeze dump cake?
Absolutely—just wrap well and freeze for up to 3 months.
Conclusion
Whether you’re feeding a crowd or simply craving something sweet, Strawberry Dump Cake is the perfect dessert. It’s quick, flexible, and endlessly adaptable. From classic versions with pie filling to creative twists with cheesecake or rhubarb, this dessert is a guaranteed crowd-pleaser.
So grab that cake mix, a few strawberries, and a stick of butter—you’re just one dump away from dessert bliss.
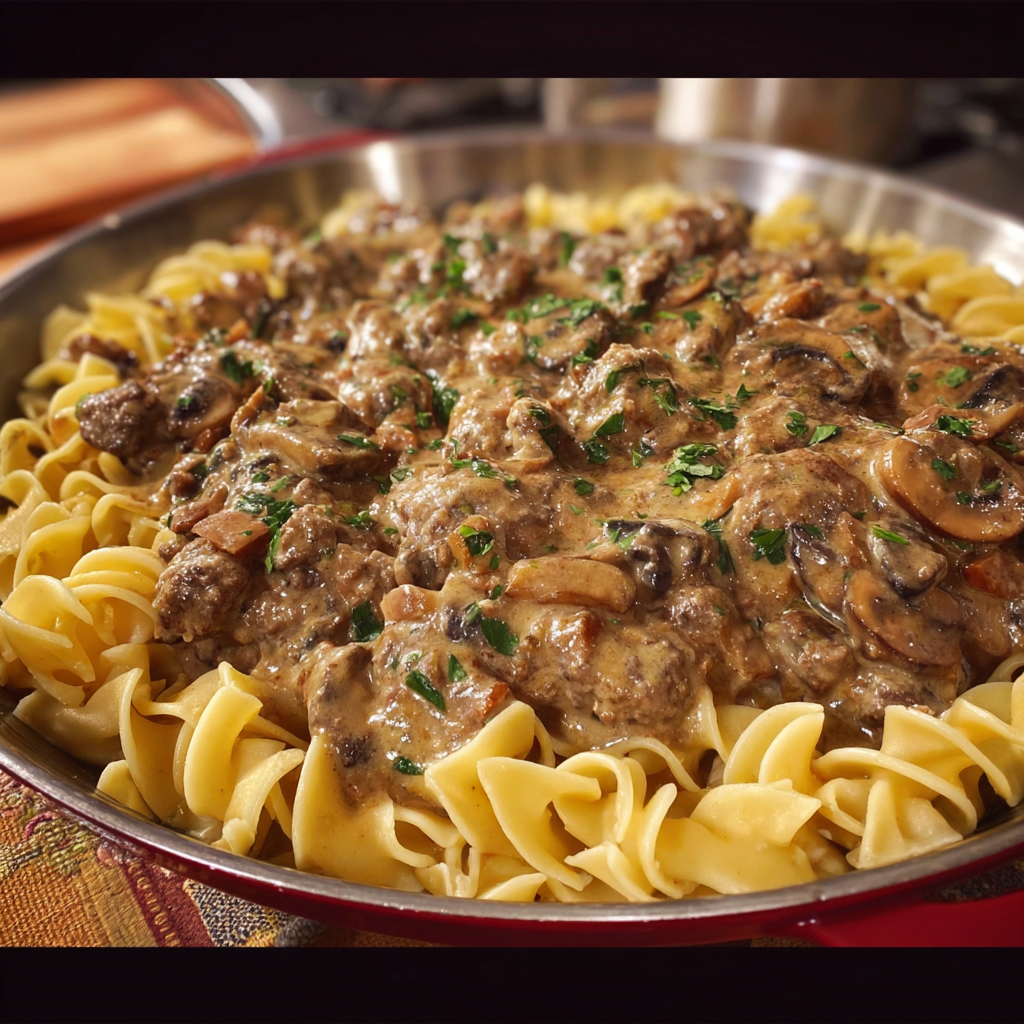
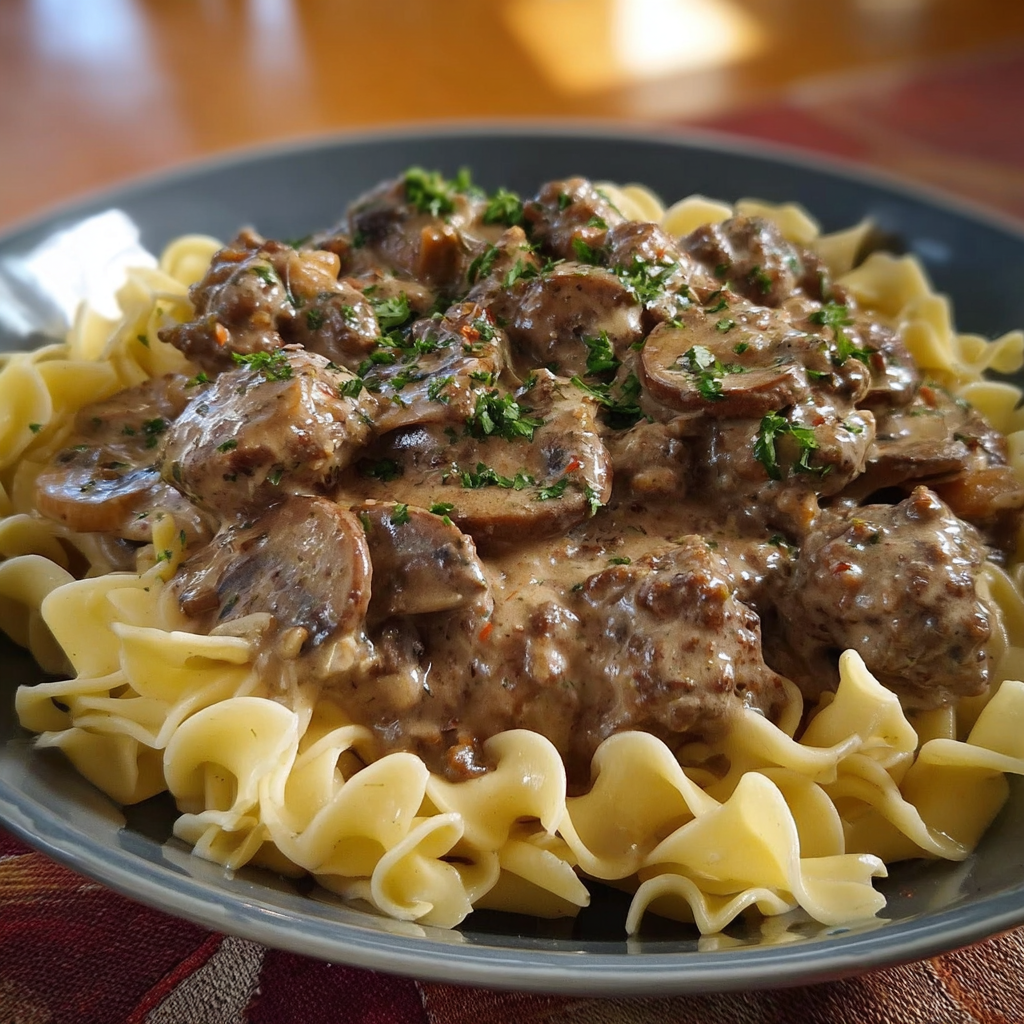
Hamburger Stroganoff: A Classic Comfort Food Made Easy
Introduction
Few dishes bring comfort to the table like Hamburger Stroganoff. This hearty meal combines ground beef, mushrooms, and a creamy sauce served over egg noodles or rice. It’s budget-friendly, quick to make, and perfect for busy weeknights or family gatherings.
While the dish is known today as an American staple, its roots trace back to Russia. The original beef stroganoff was created with strips of beef in a creamy sauce, later adapted into countless variations across the world. For a deeper dive into the history of beef stroganoff, it’s fascinating to see how this humble recipe transformed into the ground beef version we love today.
Nutritionally, hamburger stroganoff strikes a balance of protein, carbohydrates, and fats. Ground beef offers plenty of protein, but health experts recommend moderation when consuming red meat. The nutritional profile of red meat is worth understanding so you can make healthy swaps where needed, like lean beef or ground turkey.
Much like other cozy classics, such as the rich flavors in this Cheesy Hamburger Potato Soup, stroganoff delivers warmth and satisfaction in every bite.
A Brief History of Stroganoff
- Originated in 19th-century Russia as a noble family dish
- Named after the Stroganov family
- Spread internationally, with versions in France, the U.S., and beyond
- Adapted with ground beef during the 20th century in America for affordability and convenience
For another creative twist on stroganoff, check out this hearty Lentil Mushroom Stroganoff — a plant-based version that keeps all the creamy comfort without the meat.
Key Ingredients in Hamburger Stroganoff
The beauty of Hamburger Stroganoff lies in its ability to transform everyday pantry staples into a rich, flavorful, and comforting dish. Let’s break down the essential ingredients and how each one plays a role in creating the perfect stroganoff.
1. Ground Beef
The foundation of this dish is ground beef, which provides savory depth and hearty texture.
- Lean vs. Regular Beef: Lean ground beef (90/10) keeps the sauce from being overly greasy, while regular beef (80/20) offers more flavor but requires draining excess fat.
- Alternatives: Ground turkey or chicken can lighten the dish without sacrificing richness.
2. Mushrooms
Mushrooms bring an earthy, umami flavor that balances the creaminess of the sauce.
- Fresh Mushrooms: Cremini or white button mushrooms are most common. Sautéing them until golden enhances their flavor.
- Canned Mushrooms: A convenient option, though they’re softer and less flavorful than fresh.
- Optional Swap: If you’re not a mushroom fan, you can leave them out or replace them with zucchini or bell peppers for texture.
3. Onions and Garlic
These aromatics are the unsung heroes of stroganoff.
- Onions: Yellow onions offer a sweet, mellow base, while red onions bring a sharper bite.
- Garlic: Adds a robust aroma and depth that complements the beef and mushrooms.
- Tip: Always sauté until fragrant and slightly caramelized to build the best flavor foundation.
4. Sour Cream
Perhaps the most iconic ingredient, sour cream gives stroganoff its signature creamy tang.
- Classic Use: Added at the end of cooking to prevent curdling, it enriches the sauce with smoothness and body.
- Substitutes: Plain Greek yogurt is a healthier, high-protein swap. For dairy-free diets, cashew cream or coconut milk can achieve a similar creamy texture.
5. Beef Broth or Stock
The sauce needs liquid, and beef broth delivers the best balance of savory depth and richness.
- Homemade vs. Store-Bought: Homemade broth adds unmatched flavor, but quality store-bought broth works well too.
- Vegetable Broth: Works if you’re making a vegetarian version with plant-based “beef.”
6. Egg Noodles (or Alternatives)
Traditionally, stroganoff is served over egg noodles, which soak up the sauce beautifully.
- Egg Noodles: Their wide, flat shape holds onto the creamy sauce.
- Alternatives: Rice, mashed potatoes, or even zucchini noodles (zoodles) for low-carb diets.
- Gluten-Free Options: Use gluten-free pasta or quinoa for a lighter twist.
7. Flavor Boosters and Optional Add-Ins
The base ingredients are delicious on their own, but a few extras can elevate the dish:
- Worcestershire Sauce: Adds a subtle tang and depth.
- Paprika: Smoked or sweet paprika enhances the color and flavor.
- Dijon Mustard: A classic addition in many stroganoff recipes for a little sharpness.
- Fresh Herbs: Parsley, thyme, or dill bring freshness.
- Cheese: A sprinkle of Parmesan or Gruyère can add extra richness.
8. Oil or Butter for Sautéing
Using butter gives the dish a rich, indulgent base, while olive oil offers a lighter option. Some cooks use a combination of both for the best balance.
9. Seasonings
- Salt and Pepper: Essential for balance.
- Red Pepper Flakes: Optional for a touch of heat.
- Bay Leaf: Can be simmered in the broth for subtle depth.
If you love bold and cheesy comfort food, you might also enjoy these Garlic Butter Bacon Cheeseburger Rollups — they share the same hearty flavors that make stroganoff a crowd favorite.
Step-by-Step Recipe Instructions
Making Hamburger Stroganoff at home is straightforward, but with a few extra steps and tips, you can take it from “good” to “absolutely irresistible.” Here’s a detailed walk-through:
1. Prepare Your Ingredients
Before you start cooking, gather and prep everything. Dice one medium onion, mince two cloves of garlic, and slice about 8 ounces of mushrooms. Having everything ready makes the process smooth and stress-free.
- Pro Tip: If you’re short on time, buy pre-sliced mushrooms and frozen diced onions.
2. Brown the Ground Beef
Heat a large skillet over medium-high heat. Add 1 pound of lean ground beef and break it up with a wooden spoon as it cooks. Continue cooking until it’s fully browned and no pink remains. Drain any excess fat to keep the dish from becoming greasy.
- Tip: Let the beef sear for a minute before stirring to build flavor.
3. Sauté the Aromatics
Once the beef is cooked and drained, push it to the side of the skillet. Add a small drizzle of olive oil or butter, then toss in your diced onion and garlic. Cook for 2–3 minutes until fragrant. Add in the mushrooms and sauté until they’re golden and softened.
- Optional Add-In: A sprinkle of smoked paprika or thyme here can elevate the flavor.
4. Build the Sauce
Stir the beef and aromatics together. Sprinkle in 2 tablespoons of flour and mix well—this helps thicken the sauce later. Slowly pour in 2 cups of beef broth, stirring constantly to avoid lumps. Add 1 tablespoon of Worcestershire sauce and salt and pepper to taste. Reduce the heat to medium-low and let it simmer for 5–7 minutes until the sauce begins to thicken.
- Variation: Swap half the broth for white wine for a more traditional Russian twist.
5. Stir in Sour Cream
Turn the heat down to low before adding 1 cup of sour cream. Stir gently until the sauce becomes smooth and creamy. Do not boil at this stage—high heat can cause the sour cream to curdle.
- Healthier Option: Use plain Greek yogurt instead of sour cream for extra protein and fewer calories.
6. Cook the Noodles
While the sauce simmers, bring a large pot of salted water to a boil. Add 12 ounces of egg noodles and cook according to package directions until al dente. Drain well and toss with a little butter to prevent sticking.
7. Combine and Serve
Pour the creamy beef mixture over the warm noodles, or serve it side by side. Garnish with fresh parsley or chives for a pop of color.
- Serving Suggestions: Pair with a crisp green salad, roasted vegetables, or a crusty piece of bread for a complete meal.
Variations and Adaptations
- With cream of mushroom soup for a quick one-pan meal.
- Without mushrooms for kids or picky eaters.
- Gluten-free served over rice or gluten-free pasta.
- Dairy-free with cashew cream instead of sour cream.
- Slow cooker version for set-it-and-forget-it cooking.
Nutritional Value and Healthier Swaps
- Use lean ground beef or substitute with turkey for lower fat.
- Replace sour cream with Greek yogurt for protein.
- Choose whole wheat pasta or zucchini noodles for added fiber.
Serving Ideas and Pairings
Pair hamburger stroganoff with:
- Crusty bread
- Fresh green salad
- Roasted vegetables
- Steamed broccoli
Storage, Freezing, and Reheating Tips
- Refrigerate in airtight containers for up to 4 days.
- Freeze in portions without noodles to prevent mushiness.
- Reheat on the stovetop over low heat; add a splash of broth if sauce thickens.
For another freezer-friendly comfort recipe, this One Pot Macaroni Cheeseburger Soup is a perfect companion to stroganoff in your meal prep rotation.
Common Mistakes to Avoid
- Adding sour cream too early (causes curdling).
- Overcooking beef, making it dry.
- Forgetting to season the sauce well.
- Skipping fresh garnish like parsley.
Expert Tips
- Brown beef fully for flavor.
- Toast paprika and seasonings before adding broth.
- Add Dijon mustard for subtle sharpness.
- Stir in sour cream gently at the end.
FAQs
What’s the difference between beef stroganoff and hamburger stroganoff?
Beef stroganoff uses strips of steak, while hamburger stroganoff uses ground beef for a faster, budget-friendly option.
Can I make hamburger stroganoff ahead of time?
Yes, but add sour cream just before reheating for best texture.
How do I thicken the sauce?
Let it simmer uncovered or stir in a cornstarch slurry.
What pasta works best?
Egg noodles are classic, but rice, penne, or mashed potatoes also work.
Can it be made in a slow cooker?
Yes! Cook the beef first, then combine everything except sour cream in the slow cooker. Stir in sour cream before serving.
Conclusion

Hamburger stroganoff is proof that simple ingredients can create rich, hearty meals. Whether served traditionally over egg noodles or with modern swaps for a lighter touch, this dish remains a family favorite. Try it once, and you’ll see why it’s a go-to comfort food for generations.
Mexican Street Corn Soup: A Cozy Elote-Inspired Comfort Dish
Introduction
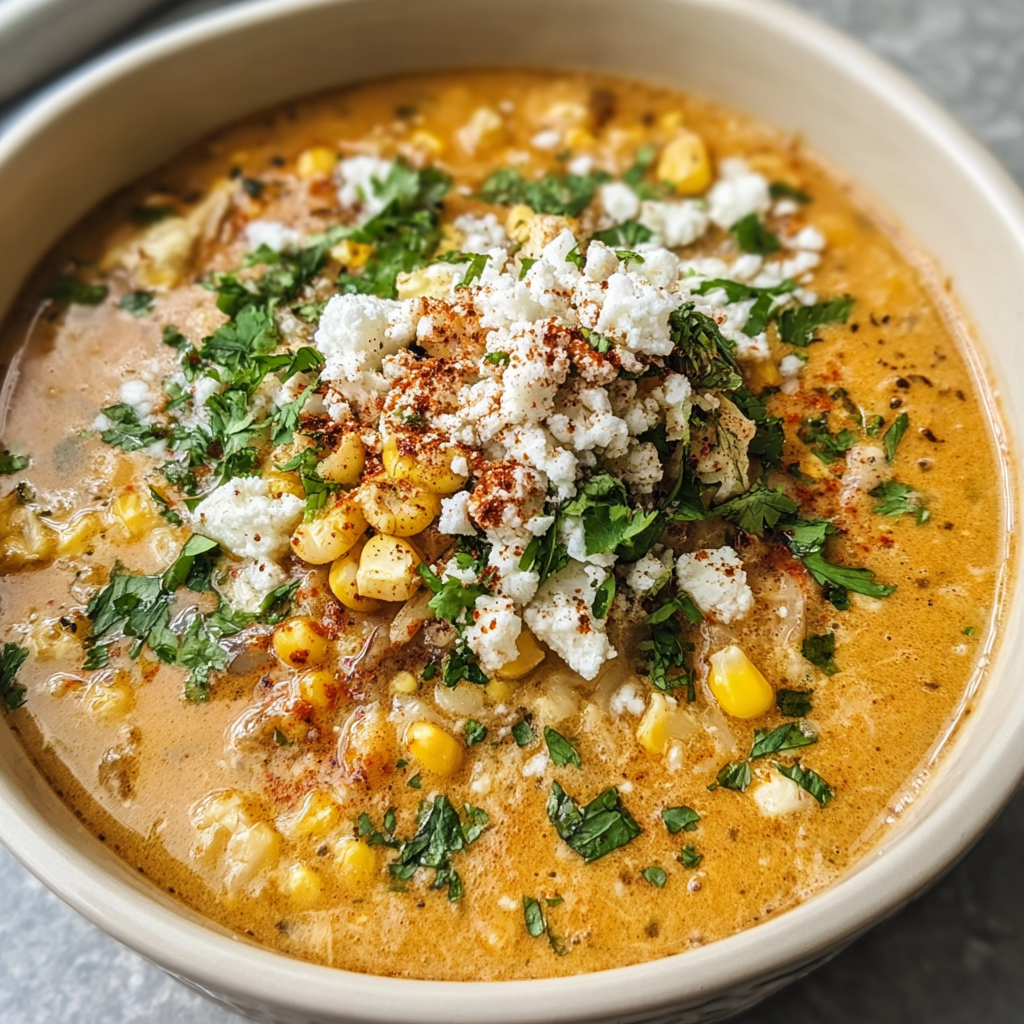
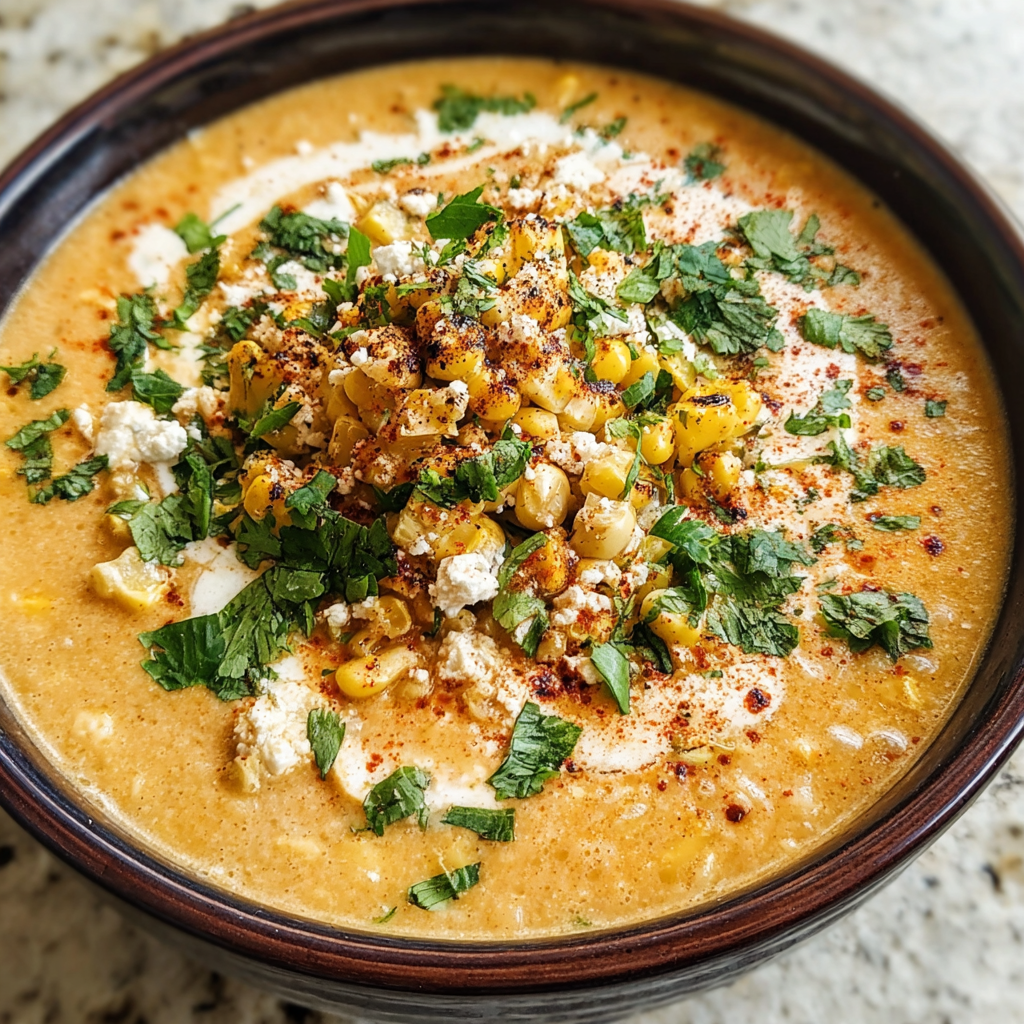
When comfort food meets bold street flavors, you get Mexican Street Corn Soup. This warm, creamy dish is inspired by elote, the beloved grilled corn sold by street vendors across Mexico. It’s a recipe that captures smoky, tangy, cheesy, and slightly spicy notes all in one bowl.
Unlike simple corn chowders, this soup delivers a dynamic mix of flavors—zesty lime, creamy broth, savory cheese, and a kick of chili. It’s no wonder it has become a popular staple on fall and winter dinner tables, as well as a summer favorite when fresh corn is abundant.
The tradition of corn runs deep in the Americas. According to the Smithsonian’s history of corn in the Americas, this crop has been a central part of diets and cultures for thousands of years. Bringing it into a cozy, soup form is a modern twist on a timeless food.
Origins and Inspiration: From Elote to Soup
Elote, or Mexican street corn, is usually served on the cob, grilled and slathered with mayonnaise, Cotija cheese, chili powder, and lime. This vibrant snack embodies Mexican street food culture—portable, flavorful, and irresistible.
Transforming elote into soup is a way to enjoy those same flavors in a bowl, especially during cooler months. The creaminess of broth, the spice of peppers, and the tang of lime come together in perfect harmony. Corn is not only a comfort food but also a nutritional powerhouse—Harvard’s Nutrition Source highlights that corn provides fiber, antioxidants, and essential vitamins that support digestive and heart health.
Transforming elote into a soup version makes it perfect for colder days. The base of broth and cream blends beautifully with roasted corn, while toppings add the signature street food flair. Fans of seafood might enjoy a twist by trying Mexican street corn with shrimp, which combines the same bold flavors with a coastal influence.
Key Ingredients and Their Roles
The magic of Mexican Street Corn Soup lies in its simple yet bold ingredients:
- Corn: Fresh sweet corn when in season, or frozen corn for convenience
- Peppers: Jalapeños or poblanos add depth and spice
- Onion and garlic: Build a flavorful base
- Broth: Chicken or vegetable stock for richness
- Dairy: Heavy cream or milk adds velvety texture
- Cheese: Cotija cheese brings salty, tangy balance
- Spices: Chili powder, cumin, and smoked paprika for heat and warmth
- Fresh elements: Cilantro and lime juice brighten every bite
These flavors also echo the health benefits of peppers—Cleveland Clinic notes that chili peppers may improve metabolism, reduce inflammation, and support heart health.
Unlike other creamy corn chowders, this recipe captures authentic Mexican elements—lime, chili, Cotija cheese, and cilantro—making it a crowd-pleasing favorite. And if you enjoy exploring variations, you’ll love trying street corn flavors in a rice bowl as another way to bring the same magic to your table.
Step-by-Step Recipe Instructions
Making Mexican Street Corn Soup at home is easier than you might think, and the results are rich, flavorful, and satisfying. Below is a detailed breakdown so you can follow along with confidence.
1. Gather and Prepare Ingredients
Before you begin cooking, it’s important to get everything prepped:
- Shuck fresh corn cobs and slice off the kernels. If using frozen corn, measure it out and let it thaw slightly.
- Dice one large onion and mince three cloves of garlic.
- Slice one to two jalapeños or poblanos, removing seeds for less heat.
- Measure your broth (vegetable or chicken), cream, spices (cumin, chili powder, smoked paprika), and toppings like Cotija cheese and cilantro.
Having everything prepped in advance makes the cooking process smooth and enjoyable.
2. Sauté the Aromatics
Start by heating two tablespoons of oil or butter in a large pot or Dutch oven over medium heat. Add the diced onion and sauté until it becomes translucent, usually about 5 minutes. Add the minced garlic and sliced peppers, stirring until fragrant—around 1 minute.
This step creates the flavor base for the entire soup. The combination of onion, garlic, and chili peppers infuses the broth with deep, savory notes that balance beautifully with the natural sweetness of corn.
3. Toast the Spices
Push the vegetables to the side of the pot and sprinkle in the spices:
- 1 teaspoon cumin
- 1 teaspoon chili powder
- ½ teaspoon smoked paprika
Let the spices toast for 30–60 seconds. This releases their essential oils and enhances their flavor, ensuring your soup is aromatic and robust rather than flat.
4. Add the Corn and Broth
Now it’s time for the star ingredient—corn. Stir in about 4 cups of kernels, coating them in the spiced mixture. Pour in 4 cups of chicken or vegetable broth, scraping the bottom of the pot to release any flavorful bits.
Bring the mixture to a gentle boil, then reduce the heat to low and simmer for 15–20 minutes. This allows the corn to soften and the spices to blend seamlessly into the broth.
5. Blend for Creamy Texture
Once the soup has simmered, decide how creamy you want it. For a smooth, velvety consistency, use an immersion blender directly in the pot. For a chunkier, chowder-like texture, blend just half the soup and leave the rest with whole kernels.
Tip: If you don’t have an immersion blender, transfer half the soup to a countertop blender in batches, being careful with hot liquids.
6. Add Cream and Cheese
Return the soup to a gentle simmer. Stir in 1 cup of heavy cream (or milk for a lighter option). Add ½ cup crumbled Cotija cheese and let it melt into the broth. The result is a silky, tangy richness that makes this dish so satisfying.
For a dairy-free version, use coconut milk and vegan cheese alternatives.
7. Season and Adjust
Taste the soup and adjust seasoning as needed. Add salt and black pepper to balance the flavors. Squeeze in the juice of one lime to cut through the richness and add brightness.
8. Garnish and Serve
Ladle the soup into bowls and top with your choice of garnishes:
- Crumbled Cotija cheese
- Fresh cilantro
- Extra lime wedges
- Sliced avocado
- Tortilla strips or crushed tortilla chips
- A drizzle of hot sauce for heat
These toppings not only enhance flavor but also make the soup visually appealing, perfect for serving at family dinners or gatherings.
9. Enjoy and Experiment
Serve hot with warm tortillas, cornbread, or a side salad. Don’t be afraid to experiment—add grilled chicken, roasted shrimp, or even diced potatoes to create variations. This recipe is adaptable, and each tweak can make the dish feel brand new.
Variations and Adaptations
One of the best things about Mexican Street Corn Soup is its flexibility. You can easily adapt it to dietary preferences or seasonal availability:
- Vegetarian: Use vegetable broth and skip any meat-based toppings
- Vegan: Swap dairy cream with coconut milk or cashew cream, and use vegan cheese alternatives
- Spicy: Add extra jalapeños, chipotle peppers, or a splash of hot sauce
- Street Corn Chowder: Include diced potatoes for a thicker, chowder-like consistency
- Roasted Corn: Roast corn before adding for a smoky twist
- Quick version: Use frozen corn and pre-diced onions for a weeknight shortcut
If you like experimenting with spices, try pairing this soup with Cajun-style rice with peppers for a fusion-style meal.
Nutritional Value and Health Benefits
This soup doesn’t just taste good—it’s also packed with nutrients.
- Corn provides dietary fiber, antioxidants like lutein, and essential vitamins B and C.
- Chili peppers offer capsaicin, which may boost metabolism and reduce inflammation.
- Cotija cheese adds protein and calcium, though you can lighten the dish with Greek yogurt.
- Broth and vegetables supply hydration, minerals, and immune-boosting properties.
With thoughtful substitutions, this dish can be made lighter while still retaining its bold flavors.
Serving Ideas and Pairings
Mexican Street Corn Soup can be served as:
- A hearty starter for a Mexican-inspired dinner
- A main dish alongside warm tortillas or cornbread
- Paired with fresh salads (like avocado and tomato salad)
- Complemented by grilled chicken, steak, or shrimp
It’s also perfect alongside warming soups like this cabbage soup for a cozy spread.
For gatherings, serve it family-style with toppings laid out so guests can customize their bowls.
Storage, Freezing, and Reheating Tips
This soup is make-ahead friendly:
- Refrigeration: Store in an airtight container for up to 4 days
- Freezing: Freeze portions in containers or freezer bags for up to 3 months
- Reheating: Warm gently on the stovetop or microwave, stirring in extra broth if it thickens
Common Mistakes to Avoid
- Overcooking corn: It should be tender, not mushy
- Skipping acidity: Lime juice balances creaminess
- Too much spice: Add chili gradually and taste as you go
- Heavy blending: Leave some corn whole for texture
Expert Tips for the Best Mexican Street Corn Soup
- Roast corn kernels for a smoky, charred flavor
- Garnish generously with Cotija, cilantro, and lime for authentic taste
- For creamy richness, stir in sour cream or Greek yogurt just before serving
- Adjust consistency by blending half the soup and leaving half chunky
FAQs About Mexican Street Corn Soup
Can I use frozen corn instead of fresh?
Yes, frozen corn works well and saves time.
Is this soup spicy?
It can be mild or spicy, depending on the type and amount of peppers you use.
Can it be made dairy-free?
Yes, use coconut milk or plant-based alternatives.
What toppings go best with it?
Cotija cheese, lime juice, cilantro, tortilla strips, avocado, and hot sauce.
How can I thicken the soup?
Add diced potatoes or blend more of the corn base.
Is it gluten-free?
Yes, as long as the broth and seasonings used are gluten-free.
Conclusion

Mexican Street Corn Soup is a celebration of flavor and comfort. With its creamy broth, zesty lime, and bold chili spices, it transforms a classic street snack into a cozy meal. For a full comfort-food experience, try pairing it with hearty cheesy soups or other warming dishes.
So grab some corn, lime, and Cotija cheese—it’s time to bring Mexican street flavors to your table in the form of this hearty, soul-warming soup.

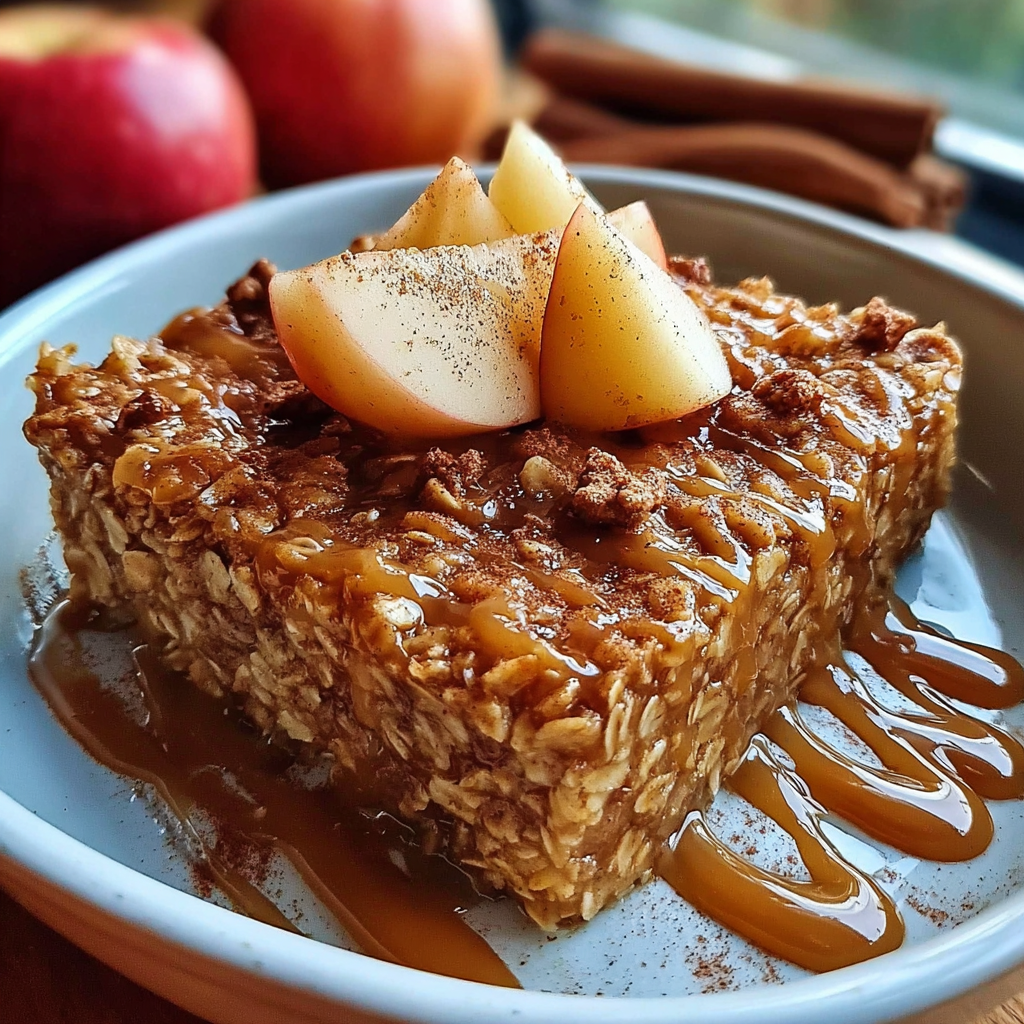
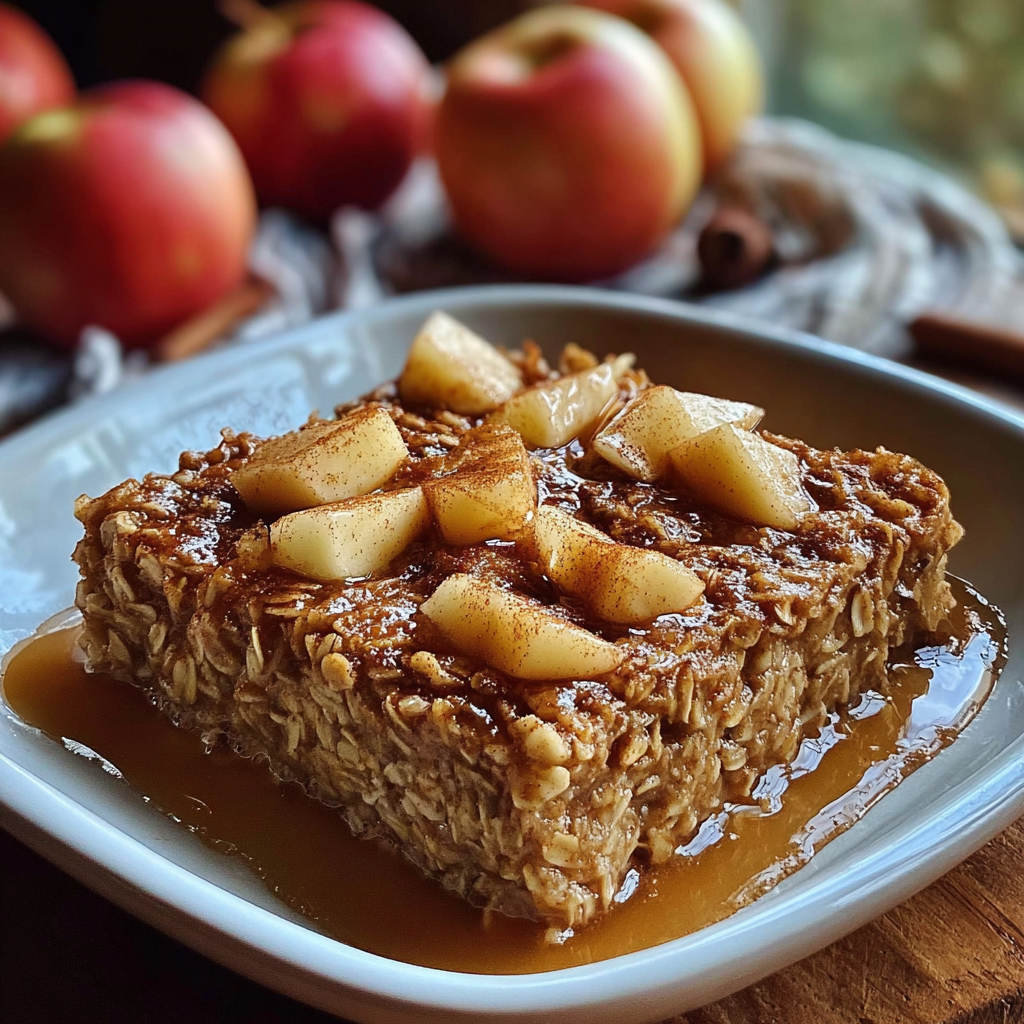
Amish-Style Apple and Cinnamon Baked Oatmeal: A Hearty and Comforting Breakfast
Introduction
There’s nothing quite like waking up to the smell of baked oatmeal wafting through the house. When it comes to cozy and wholesome breakfasts, Amish-Style Apple and Cinnamon Baked Oatmeal tops the list. This rustic dish combines hearty oats, tender apples, and warming spices into a casserole-style bake that’s perfect for chilly mornings, family gatherings, or meal prep.
Unlike regular stovetop oatmeal, this version has a slightly chewy, cake-like texture that holds together beautifully. It’s a traditional recipe rooted in Amish kitchens, passed down for generations, and enjoyed in homes far beyond Pennsylvania Dutch country.
If you’re a fan of nostalgic breakfast flavors like gingerbread waffles, this apple-cinnamon oat bake will feel right at home on your table.
The History of Amish Baked Oatmeal
The Amish community has a long tradition of preparing hearty, make-ahead breakfasts that fuel long days of work. Among staples like homemade bread, scrapple, and pies, baked oatmeal emerged as a practical dish that could feed many people at once.
This recipe likely originated in Pennsylvania, where oats were plentiful and inexpensive. The Amish valued foods that were simple, nourishing, and easy to adapt. Apples—widely grown in the region—became a natural pairing with cinnamon, turning a plain oat bake into a fragrant and satisfying breakfast.
According to LancasterPA.com’s guide to Amish food traditions, many Amish recipes reflect the community’s values of thrift, simplicity, and comfort. Baked oatmeal fits perfectly into that heritage, serving as both nourishment and a way to gather families around the table.
Just like a sweet and spiced red velvet cinnamon roll, Amish baked oatmeal delivers comfort in every bite. Its roots are firmly tied to Pennsylvania Dutch cooking traditions, which favored simplicity and family-style dishes.
Why Oats, Apples, and Cinnamon?
What makes Amish-Style Apple and Cinnamon Baked Oatmeal so timeless is its combination of wholesome oats, crisp apples, and warming spices. Oats are not only filling but also linked to numerous health benefits. In fact, research from Harvard’s Nutrition Source shows that oats provide soluble fiber, help lower cholesterol, and support heart health.
Cinnamon isn’t just flavorful—it has also been studied for its role in blood sugar balance. As noted by the Cleveland Clinic, cinnamon may help improve insulin sensitivity, making it a smart addition to a balanced breakfast. Combined with naturally sweet apples, this dish delivers both comfort and nourishment in every bite.
The combination is as seasonally comforting as enjoying a bowl of oatmeal custard breakfast on a crisp fall morning.
Ingredients Breakdown
To make this recipe shine, it’s important to understand the role of each ingredient:
- Oats: Rolled oats give the best texture—soft, but not mushy. Quick oats can be used in a pinch, but avoid steel-cut oats unless pre-cooked.
- Apples: Choose firm, slightly tart apples like Granny Smith or Honeycrisp for balance. Sweeter apples like Gala add a softer flavor.
- Sweeteners: Brown sugar adds depth, while maple syrup or honey gives natural sweetness.
- Spices: Cinnamon is the star, but nutmeg and cloves add warmth.
- Milk: Whole milk provides richness; almond or oat milk works for dairy-free versions.
- Eggs: Help bind the oatmeal into its cake-like texture.
- Nuts and Add-ins: Walnuts, pecans, or raisins bring extra texture and nutrition.
For a dessert-like spin, try layering it with flavors reminiscent of an apple fritter cake for extra indulgence.
Step-by-Step Recipe Instructions
Here’s how to make your own Amish-Style Apple and Cinnamon Baked Oatmeal:
- Prep the apples
- Peel (optional) and dice apples into small cubes.
- For extra flavor, sauté them briefly in butter and cinnamon.
- Mix dry ingredients
- In a large bowl, combine oats, baking powder, cinnamon, nutmeg, and a pinch of salt.
- Whisk wet ingredients
- In another bowl, whisk together milk, eggs, melted butter (or oil), vanilla, and sweetener of choice.
- Combine and assemble
- Pour the wet mixture into the dry and stir until combined.
- Fold in apple chunks and nuts if using.
- Spread evenly into a greased baking dish.
- Bake
- Bake at 350°F (175°C) for 35–40 minutes, until the top is golden and the center set.
- Serve
- Enjoy warm with a splash of milk, a dollop of yogurt, or a drizzle of maple syrup.
Variations of Amish-Style Baked Oatmeal
One of the best things about this dish is its adaptability. You can customize it based on dietary needs or flavor preferences:
- Overnight prep: Assemble the mixture the night before, refrigerate, then bake in the morning.
- Fruit swaps: Replace apples with pears, peaches, or mixed berries.
- Gluten-free: Use certified GF oats and add almond flour to the topping.
- Vegan: Replace eggs with flaxseed or chia “eggs,” use plant-based milk and coconut oil.
- Kid-friendly: Reduce spices and add mini chocolate chips for fun.
- Add pumpkin purée for a fall twist similar to creamy pumpkin pasta sauce.
If you love fruity, spiced bakes, don’t miss experimenting with apple fritter cake style add-ins.
Nutrition and Health Benefits
Amish-Style Apple and Cinnamon Baked Oatmeal isn’t just a cozy breakfast dish—it’s also a powerhouse of nutrition when made with wholesome ingredients. Each component of this recipe contributes unique health benefits, making it both satisfying and nourishing.
The Role of Oats
Oats are the backbone of this dish and provide a rich source of dietary fiber, particularly beta-glucan. This soluble fiber is well studied for its ability to:
- Support heart health by helping reduce LDL (“bad”) cholesterol levels
- Promote steady blood sugar control, preventing energy crashes
- Aid digestion and keep you feeling full longer
A serving of rolled oats also delivers important nutrients like magnesium, iron, and plant-based protein. Compared to sugary cereals, oats provide slow-releasing energy, making this dish a smart choice for sustained focus and energy throughout the morning.
The Power of Apples
Apples bring natural sweetness, reducing the need for refined sugar. They’re a good source of vitamin C, potassium, and antioxidants that may protect against cellular damage. Their fiber content—especially pectin—helps support gut health. The balance of tartness and sweetness also complements the warming spices perfectly.
Cinnamon and Spices
Cinnamon is more than just a flavor enhancer. Studies suggest it may improve insulin sensitivity and help regulate blood sugar levels. Combined with other spices like nutmeg or cloves, it adds depth while offering natural anti-inflammatory properties.
Protein and Healthy Fats
Eggs and milk in this recipe provide high-quality protein, which helps with satiety and muscle repair. Adding nuts such as walnuts or pecans introduces healthy fats, vitamin E, and additional protein, turning a simple breakfast into a more balanced meal.
A Healthier Comfort Food
Unlike many breakfast casseroles or pastries, Amish baked oatmeal avoids heavy creams and excessive sugar. It’s a comforting dish that can easily be adapted for dietary needs—swap in almond milk for dairy-free, use honey or maple syrup for natural sweetness, or add chia seeds for extra fiber and omega-3s.
Portion and Lifestyle Fit
A typical serving comes in at about 250–300 calories, depending on toppings and add-ins. It’s hearty enough to serve as a stand-alone breakfast but can also pair with yogurt or fresh fruit for an even more nutrient-dense meal.
In short, Amish-Style Apple and Cinnamon Baked Oatmeal strikes the rare balance of being indulgent yet wholesome—perfect for anyone who wants comfort food that also supports their health.
Serving Ideas & Pairings
This dish is incredibly versatile. Here are some ways to enjoy it:
- Served warm with cold milk poured over the top
- Cooled and cut into squares for lunchboxes
- With a dollop of Greek yogurt and honey as a protein-rich breakfast
- As a light dessert with whipped cream or ice cream
On a weekend brunch table, it pairs beautifully with fluffy coconut cream pancakes.
Storage, Freezing, and Reheating Tips
One of the biggest advantages of Amish-Style Apple and Cinnamon Baked Oatmeal is how well it keeps for later meals. Whether you’re making a large pan for family breakfast or preparing ahead for busy mornings, this dish is easy to store, freeze, and reheat without losing its delicious flavor or texture.
Refrigerating
- Allow the oatmeal to cool completely before storing—this prevents condensation and sogginess.
- Transfer slices or the entire bake into an airtight container.
- Refrigerated baked oatmeal will stay fresh for 4–5 days.
- To keep moisture in, cover the dish tightly with foil or plastic wrap if you’re storing it in the original baking pan.
Freezing
Baked oatmeal freezes beautifully, making it perfect for meal prep.
- Cut into individual squares before freezing so you can grab a portion at a time.
- Wrap each piece in plastic wrap or parchment, then place in a freezer-safe bag or container.
- Properly stored, baked oatmeal can last up to 3 months in the freezer.
- To prevent freezer burn, press out as much air as possible from the storage bag.
Reheating
Reheating is quick and easy, whether from the fridge or freezer:
- Microwave method: Place a square on a microwave-safe plate, cover lightly, and heat for 1–2 minutes until warmed through. Add a splash of milk if you like extra moisture.
- Oven method: Preheat oven to 300°F (150°C), cover the oatmeal with foil, and heat for about 10 minutes if refrigerated, or 20–25 minutes if frozen.
- Toaster oven method: Reheat smaller slices directly on foil or parchment for a slightly crisp edge.
Pro tip: For a freshly baked flavor, drizzle with a little milk or maple syrup after reheating, or add a dollop of yogurt for creaminess.
Common Mistakes and Expert Tips
To get perfect results, avoid these pitfalls:
- Overbaking: Leads to dry oatmeal—watch for a lightly golden top.
- Undercooking apples: Dice small so they soften evenly.
- Wrong oats: Steel-cut oats won’t cook through properly without pre-cooking.
- Skipping spices: Cinnamon is key for flavor—don’t skimp.
Pro tip: Add a sprinkle of turbinado sugar on top before baking for a slightly crunchy finish.
FAQs About Amish-Style Baked Oatmeal
What is Amish baked oatmeal made of?
It’s made with oats, milk, eggs, sweeteners, and spices, baked into a casserole with fruit like apples.
Can you use quick oats instead of rolled oats?
Yes, but the texture will be softer and less chewy. Rolled oats are preferred.
Do you eat Amish baked oatmeal hot or cold?
Both! Warm with milk is traditional, but cold squares make great grab-and-go snacks.
Can baked oatmeal be made ahead of time?
Absolutely. Assemble the night before or bake and reheat throughout the week.
How do you keep baked oatmeal from getting soggy?
Don’t add too much liquid and make sure apples are well-drained if pre-cooked.
Is Amish baked oatmeal healthy?
Yes—it’s full of fiber, protein, and healthy fats, especially if sweetened naturally.
Can you freeze baked oatmeal with apples?
Yes. Freeze in portions and thaw overnight in the fridge before reheating.
Conclusion
Amish-Style Apple and Cinnamon Baked Oatmeal is more than just a recipe—it’s a tradition. With its blend of wholesome oats, fragrant cinnamon, and tender apples, it’s a dish that’s as nourishing as it is comforting. Whether you make it for a quiet family breakfast or prep it ahead for a busy week, this rustic bake brings warmth and simplicity to your mornings.
So grab some oats and apples, and experience a taste of Amish heritage in your own kitchen.

Chicken Bacon Ranch Stromboli: A Comfort Food Favorite
Chicken Bacon Ranch Stromboli is a delicious, savory dish that combines the irresistible flavors of rotisserie chicken, crispy bacon, melted cheese, and creamy ranch dressing, all wrapped in a golden, baked dough. Perfect for weeknight dinners, family gatherings, or casual entertaining, this dish offers both comfort and versatility.
Whether you’re making it from scratch or using a shortcut like refrigerated dough, this recipe brings Italian-American flavors to your kitchen without complicated steps.
Ingredients You’ll Need
To make a mouthwatering Chicken Bacon Ranch Stromboli, having the right ingredients is essential. Each component contributes to the perfect balance of flavors, from the savory bacon and tender chicken to the melty cheese and creamy ranch dressing. Below is a detailed guide to the ingredients you’ll need, including tips for substitutions and variations to customize the dish to your taste.
Dough
- 1 lb pizza dough – You can use homemade pizza dough for a more authentic texture or opt for a refrigerated pizza dough for convenience. Pre-made dough saves time and still yields a golden, crispy crust. For inspiration, check creative meals using refrigerated pizza dough.
- Flour – For dusting your work surface to prevent sticking while rolling out the dough.
Protein
- 2 cups cooked chicken, shredded – Rotisserie chicken works beautifully, saving prep time while providing juicy, flavorful meat.
- 6 slices of bacon, cooked and crumbled – Adds a smoky, savory crunch. You can substitute turkey bacon for a lighter option.
- Tip: For extra flavor, season the chicken with a pinch of garlic powder or smoked paprika before layering.
Cheese
- 1 cup mozzarella cheese, shredded – This melty cheese is key to a gooey, stretchy texture.
- ½ cup cheddar cheese, shredded – Adds a sharp, tangy note to complement the mozzarella.
- ¼ cup Parmesan cheese, grated – Enhances the overall savory flavor and adds a subtle nutty finish.
Sauce
- ¼ cup ranch dressing – Creamy and tangy, it ties together the flavors of the chicken and bacon. For a lighter option, use a low-fat ranch dressing or Greek yogurt-based ranch.
- Optional: Brush a little olive oil on the dough before rolling to enhance crispness.
Seasonings
- 1 tsp garlic powder – Adds depth and complements the ranch flavor.
- 1 tsp Italian seasoning – A mix of oregano, basil, and thyme provides a classic Italian-American flavor profile.
- Salt and pepper, to taste – Adjust according to your preference.
Egg Wash
- 1 egg, beaten – Brushed over the top of the stromboli before baking for a shiny, golden crust.
Optional Add-Ins
- Vegetables: Spinach, bell peppers, mushrooms, or onions for extra nutrition and flavor.
- Spicy elements: Jalapeños or crushed red pepper for a kick.
- Extra cheese: Gouda, provolone, or pepper jack to change the flavor profile.
Notes on Ingredient Quality
- Using fresh, high-quality ingredients—from the chicken to the cheeses—will make a noticeable difference in flavor.
- Pre-cooked chicken and refrigerated dough are great for convenience, but fresh alternatives elevate the dish for special occasions.
- Don’t skimp on the bacon or cheese; they are central to achieving the rich, indulgent flavor that makes Chicken Bacon Ranch Stromboli a crowd favorite.
By carefully selecting these ingredients, you’ll be ready to assemble a stromboli that’s flavorful, cheesy, and perfectly balanced. These components set the foundation for a dish that’s both comforting and versatile, ideal for weeknight dinners, gatherings, or casual entertaining.
Tips for Ingredients:
- Use high-quality cheese for a gooey, melty texture.
- Cook the bacon until crisp for maximum flavor.
- For convenience, explore more chicken and bacon recipes for inspiration.
How to Prepare Chicken Bacon Ranch Stromboli
Making this stromboli is straightforward if you follow these steps:
- Preheat your oven to 400°F (200°C).
- Roll out the pizza dough into a rectangle on a floured surface.
- Layer the filling: spread shredded chicken, crumbled bacon, and cheeses evenly, leaving a 1-inch border.
- Drizzle ranch dressing over the filling. For variations, discover bacon-wrapped chicken recipes to enhance the flavor profile.
- Roll the dough tightly like a jelly roll and pinch the edges to seal.
- Brush with egg wash for a golden crust.
- Bake for 20–25 minutes until golden brown and crispy.
- Cool slightly, slice, and serve with your favorite dipping sauce.
Baking Tips for the Perfect Stromboli

Baking a Chicken Bacon Ranch Stromboli to perfection requires attention to detail and a few key techniques. Follow these tips to achieve a golden, crispy crust and a flavorful, melty filling every time.
Preheat Your Oven Properly
- Ensure your oven is fully preheated to 400°F (200°C) before placing the stromboli inside.
- Using a properly preheated oven allows the dough to rise evenly and ensures the cheese melts correctly.
Use the Right Baking Surface
- A baking sheet lined with parchment paper prevents sticking and makes cleanup easier.
- For extra crispness, you can bake directly on a pizza stone preheated in the oven, which distributes heat evenly and creates a crunchy bottom crust.
Monitor Dough Thickness
- Roll your dough into an even rectangle, approximately ¼-inch thick, to ensure even baking.
- Avoid rolling too thin, as it may cause the filling to leak, and don’t make it too thick, or the center may remain undercooked.
Seal Edges Securely
- Pinch or fold the edges tightly to prevent chicken, bacon, and cheese from escaping during baking.
- For added security, you can fold the edges under and press firmly with a fork.
Brush With Egg Wash
- Brushing the top with a beaten egg gives your stromboli a glossy, golden finish.
- Optional: Sprinkle a little Parmesan cheese or Italian seasoning on top for extra flavor.
Baking Time and Temperature
- Bake for 20–25 minutes, or until the crust is golden brown.
- Check the center to ensure the filling is heated through and the cheese is melted.
Rest Before Slicing
- Allow the stromboli to rest for 5 minutes after baking.
- This prevents the cheese from spilling out and makes slicing easier.
By following these simple baking tips, your Chicken Bacon Ranch Stromboli will come out golden, crisp, and full of flavor—ready to impress family and friends. For additional inspiration,
Brown Sugar Bacon Little Smokies
Explore more quick and easy Bacon recipes.
Serving Suggestions
Chicken Bacon Ranch Stromboli is versatile and pairs well with:
- Side salads (Caesar or mixed greens)
- Marinara sauce or ranch dressing for dipping
- Roasted vegetables or garlic bread
Variations and Customizations
- Vegetarian option: Replace chicken and bacon with mushrooms, spinach, and bell peppers.
- Spicy twist: Add jalapeños or hot sauce to the filling.
- Cheese variations: Use provolone, gouda, or pepper jack for different flavor profiles.
- Mini strombolis: Make individual servings for parties or meal prep.
FAQs About Chicken Bacon Ranch Stromboli
Q: Can I make this ahead of time?
A: Yes! Assemble the stromboli and refrigerate for up to 24 hours before baking.
Q: Can I freeze it?
A: Absolutely. Wrap tightly in plastic wrap and freeze for up to 3 months. Bake directly from frozen, adding 10 extra minutes.
Q: What dipping sauces pair well?
A: Marinara, ranch, or a spicy aioli work wonderfully.
Q: Can I use a different type of dough?
A: Yes! Puff pastry or crescent roll dough can be used for a flakier texture.
Chicken Bacon Ranch Stromboli is a perfect balance of savory, cheesy, and indulgent flavors. Whether you’re cooking for family or entertaining friends, it’s a guaranteed crowd-pleaser that’s simple to make yet impressive on the table.
Serving and Storage Tips
Serving your Chicken Bacon Ranch Stromboli properly enhances both flavor and presentation:
- Slice and serve warm: Let it cool for 5 minutes after baking to prevent cheese from spilling.
- Pair with sides: Serve alongside a crisp salad, roasted vegetables, or garlic bread for a complete meal.
- Dipping sauces: Marinara sauce, extra ranch dressing, or a spicy aioli complement the cheesy filling perfectly.
Storage Tips:
- Refrigeration: Store leftover stromboli in an airtight container for up to 3–4 days.
- Freezing: Wrap tightly in plastic wrap and aluminum foil to freeze for up to 3 months. Reheat in the oven at 350°F (175°C) until warmed through.
- Meal prep idea: Slice into individual portions before freezing for convenient grab-and-go meals.
Creamy Asiago Chicken & Gnocchi
Discover more low-carb dinner options.
Why You’ll Love This Recipe
Chicken Bacon Ranch Stromboli is more than just a meal; it’s a versatile, family-friendly comfort food:
- Crowd-pleaser: Perfect for game days, parties, or casual dinners.
- Customizable: Adaptable with different cheeses, meats, or vegetables.
- Quick and easy: Especially when using pre-cooked chicken and refrigerated dough.
- Satisfying flavors: Combines the creamy richness of ranch, savory bacon, tender chicken, and melted cheese in every bite.
By following the steps outlined in this guide, you can create a stromboli that is both impressive and delicious, bringing a taste of Italian-American cuisine right into your kitchen.
Bonus Tips for Maximum Flavor
- Use high-quality ingredients: Fresh chicken and crisp bacon make a noticeable difference.
- Don’t skimp on cheese: The melty, gooey texture is essential to the stromboli experience.
- Season well: Sprinkle a bit of Italian seasoning or garlic powder for extra flavor.
- Experiment with shapes: Mini strombolis or braided versions add fun and creativity to your presentation.
With these final touches, your Chicken Bacon Ranch Stromboli is ready to impress both family and friends, offering a delicious, comforting, and versatile meal that’s perfect for any occasion.
Final Thoughts

Chicken Bacon Ranch Stromboli is a dish that perfectly blends convenience, flavor, and creativity. Its combination of cheesy goodness, savory bacon, tender chicken, and creamy ranch dressing makes it an irresistible comfort food that everyone will love.
Key Takeaways:
- Versatile: Works for weeknight dinners, parties, or meal prep.
- Customizable: Swap meats, cheeses, or vegetables to suit your taste.
- Easy to make: With pre-cooked chicken and refrigerated dough, it comes together quickly.
- Crowd-pleaser: A guaranteed hit with both kids and adults.
Cooking your own Chicken Bacon Ranch Stromboli lets you enjoy a restaurant-quality meal at home while experimenting with flavors and ingredients. Don’t be afraid to get creative—try mini versions, different cheeses, or add some heat with jalapeños.
Finally, remember that the best part of this recipe is sharing it. Serve it fresh, enjoy it with friends and family, and savor every gooey, cheesy bite.
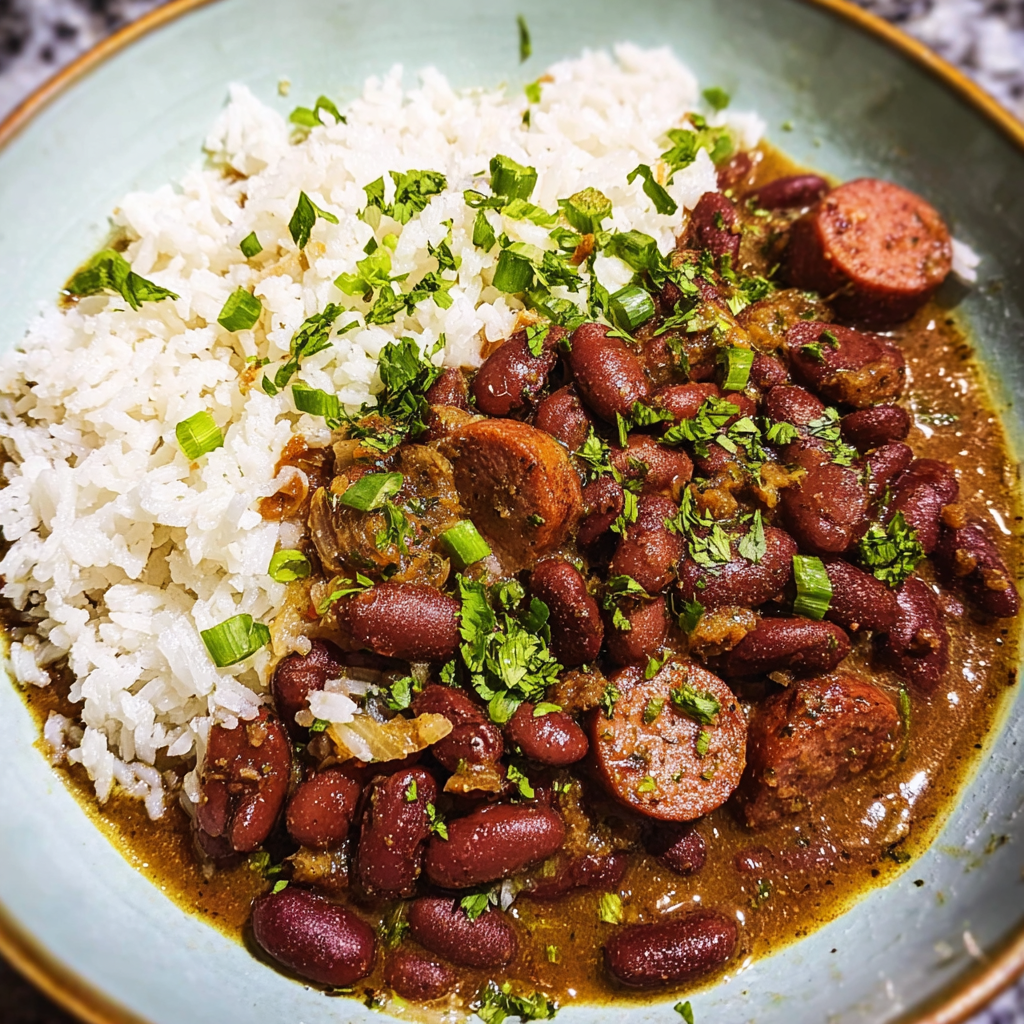
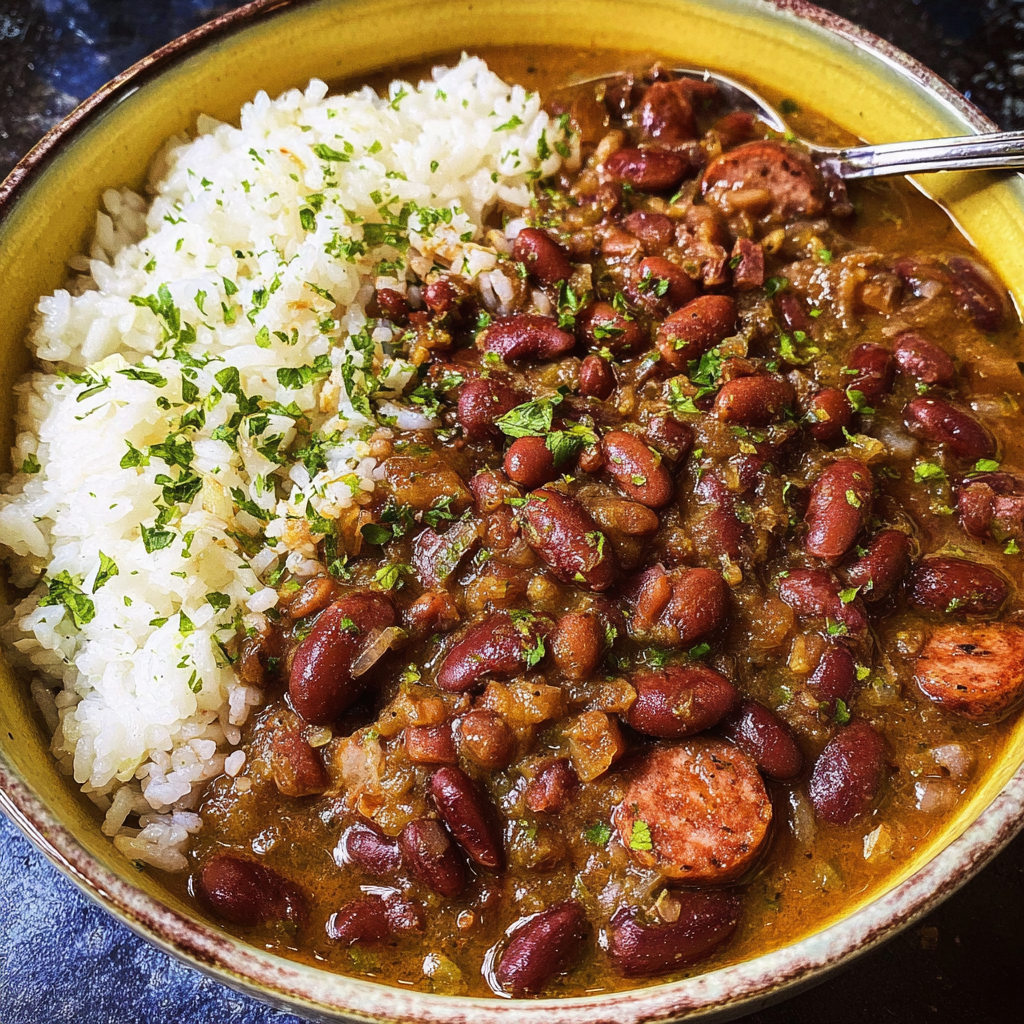
Louisiana Red Beans and Rice: A Classic Taste of Louisiana
Louisiana Red Beans and Rice is more than just a meal—it’s a symbol of New Orleans culture and tradition. Known for its hearty flavors and comforting textures, this dish has captured the hearts of home cooks and food enthusiasts worldwide. Rich in history, packed with flavor, and incredibly versatile, it’s a quintessential part of Southern and Creole cuisine.
A Taste of Tradition: The Origins of Red Beans and Rice
The roots of Louisiana Red Beans and Rice trace back to New Orleans, where the dish became a Monday staple among working families. Traditionally, Monday was laundry day, and families needed a meal that could simmer slowly while chores were done. Over time, this simple, practical dish became a beloved cultural icon.
The recipe is influenced by a mix of African, French, and Spanish culinary traditions. It highlights the flavors of the South with slow-cooked beans, smoked meats, and aromatic vegetables. To dive deeper into its origins, you can explore the rich history of red beans and rice in Louisiana, which reveals how this humble dish evolved into a regional classic.
Essential Ingredients for Authentic Flavor
To make true Louisiana Red Beans and Rice, you need the right combination of ingredients. The “holy trinity” of Creole cooking—onion, bell pepper, and celery—forms the flavor base, enhanced by smoked meats like andouille sausage and ham hocks.
- 1 lb dried red kidney beans (Camellia brand is recommended)
- 4 tablespoons unsalted butter (or bacon grease for extra richness)
- 12 ounces andouille sausage, sliced
- 1 medium white onion, finely diced
- 1 medium green bell pepper, finely diced
- 2 celery hearts, finely diced
- 1 tablespoon garlic paste or 6 cloves minced
- 1½ lbs smoked turkey wings or ham hocks
- 3 bay leaves
- Creole seasoning to taste
- Salt and pepper to taste
- 4 cups chicken broth
- 2 cups water
- 2 cups long-grain white rice
For a detailed recipe that balances smoky and spicy flavors perfectly, check out this Creole red beans and rice recipe.
Cooking Techniques: How to Achieve Perfect Red Beans
Cooking red beans and rice requires patience and attention to detail. Here’s a step-by-step method for creating the perfect pot:
- Soak the beans overnight or use a quick-soak method to soften them.
- Brown the sausage in a large pot to release its rich flavor.
- Sauté the holy trinity (onion, bell pepper, celery) in butter until softened.
- Add garlic and cook until fragrant.
- Combine beans, smoked meat, bay leaves, Creole seasoning, salt, and pepper.
- Pour in chicken broth and water, then bring to a boil.
- Simmer for 2–3 hours until the beans are tender, stirring occasionally.
- Remove smoked meat, shred, and return to the pot.
- Mash some beans to create a creamy texture.
- Serve over freshly cooked rice.
This slow-cooked method allows the flavors to meld beautifully, making every bite satisfying. For tips on ingredient substitutions and flavor variations, explore Camellia Brand’s take on this classic dish.
Regional Variations Across Louisiana
Louisiana Red Beans and Rice is a dish that showcases the rich culinary diversity of the state. While the core ingredients—red beans, smoked meats, and the holy trinity of onions, bell peppers, and celery—remain consistent, regional differences give each version a unique character.
Creole Style
The Creole version, often associated with New Orleans, tends to be slightly lighter and more tomato-based. Creole cooks frequently incorporate ingredients such as:
- Diced tomatoes or tomato paste
- A variety of fresh herbs like thyme, parsley, or oregano
- A moderate level of spice from cayenne or Creole seasoning
This version balances smoky and tangy flavors, creating a more nuanced profile while still retaining the comforting essence of the dish.
Cajun Style
In contrast, the Cajun version, common in rural areas of southern Louisiana, emphasizes smoky, robust flavors. It often features:
- Heavier use of smoked meats like andouille sausage and ham hocks
- Minimal or no tomatoes
- Bold, earthy seasoning with extra garlic and cayenne
Cajun Red Beans and Rice are generally richer and heartier, reflecting the rustic, resourceful cooking traditions of the region.
Home-Style Adaptations
Across Louisiana, many families put their own spin on this classic dish. Some popular adaptations include:
- Adding okra or other local vegetables for texture and nutrition
- Swapping proteins, such as smoked turkey for pork, to reduce fat
- Adjusting spices to suit personal preferences, from mild to fiery
These regional variations demonstrate how Louisiana Red Beans and Rice is more than a recipe—it’s a canvas for local flavors, cultural identity, and family traditions. Whether served Creole-style, Cajun-style, or with a modern twist, each version delivers a hearty, comforting meal that embodies the soul of Louisiana cuisine.
Nutritional Value and Health Considerations
Louisiana Red Beans and Rice is not only a flavorful comfort food but also a dish with notable nutritional benefits. Its combination of protein-rich beans, smoked meats, and complex carbohydrates from rice makes it both satisfying and nourishing. Understanding its nutritional profile can help you enjoy this classic dish while making mindful choices for your diet.
Protein and Fiber
- Red beans are a fantastic source of plant-based protein, making them essential for muscle repair and energy.
- They are also high in dietary fiber, which supports digestive health, helps regulate blood sugar levels, and contributes to a feeling of fullness.
- When combined with smoked meats like andouille sausage or ham hocks, the protein content of the dish increases, supporting overall satiety and nutrient intake.
Vitamins and Minerals
- Beans provide iron, which is crucial for oxygen transport in the blood.
- They also supply potassium, aiding in heart and muscle function, and folate, essential for DNA synthesis and cell growth.
- Vegetables in the holy trinity—onion, bell pepper, and celery—contribute vitamins A, C, and K, as well as antioxidants that support immune health.
Caloric Content and Health Considerations
- A standard serving of red beans and rice provides a moderate calorie count, but the overall healthiness depends on the type of smoked meats and fats used.
- Opting for smoked turkey or lean ham instead of fattier sausages can reduce saturated fat while maintaining flavor.
- For a vegetarian version, omit meats and add smoked paprika or mushrooms to replicate depth, lowering cholesterol and calories while keeping the dish hearty.
Dietary Adaptability
- The dish is gluten-free when prepared traditionally with rice, making it suitable for gluten-sensitive individuals.
- It is naturally high in protein and fiber, making it a great option for balanced meals.
- Portion control and mindful seasoning adjustments can help align it with specific dietary goals, such as weight management or heart health.
Incorporating Louisiana Red Beans and Rice into a balanced diet allows you to enjoy a classic Southern meal without compromising nutrition. By tweaking ingredients and cooking methods, this dish can be both comforting and health-conscious.
Lentil Mushroom Stroganoff
Discover more low-carb dinner options.
Tips for Perfect Red Beans and Rice
- Soak beans properly: Reduces cooking time and improves digestibility.
- Use smoked meats: Adds depth and a signature flavor.
- Season gradually: Adjust Creole seasoning and salt to taste.
- Let it rest: Allow the dish to sit for a while; flavors intensify over time.
- Don’t rush: Slow simmering is key to achieving the creamy texture.
For more expert tips and tricks, check Southern Living’s guide to great weeknight red beans and rice.
Common Mistakes to Avoid
Even experienced cooks can make errors:
- Skipping the soaking step: Leads to unevenly cooked beans.
- Overcrowding the pot: Prevents proper cooking and flavor development.
- Ignoring impurities: Skim foam and residue for a cleaner taste.
- Rushing simmering time: Beans need time to soften and absorb flavors.
FAQs About Louisiana Red Beans and Rice
Q: What is the best type of beans to use?
A: Dried red kidney beans, preferably Camellia brand, are ideal for authentic flavor.
Q: Can I use canned beans?
A: Yes, but the texture will be less creamy and the dish may cook faster.
Q: Is there a vegetarian version?
A: Absolutely! Replace smoked meats with smoked paprika, mushrooms, or vegan sausage.
Q: How can I make it spicier?
A: Add cayenne pepper, hot sauce, or extra Creole seasoning.
Q: Can I freeze leftovers?
A: Yes! Store in an airtight container for up to 3 months. Reheat slowly to maintain texture.
Louisiana Red Beans and Rice is more than just a dish—it’s a tradition that celebrates culture, family, and flavor. With these tips, ingredients, and methods, anyone can bring a taste of New Orleans into their own kitchen.
Serving Suggestions and Pairings
Louisiana Red Beans and Rice shines when served thoughtfully. Here are some ways to elevate the meal:
- Traditional side dishes: Serve with crusty French bread or cornbread to soak up the flavorful sauce.
- Garnishes: Chopped green onions, parsley, or a dash of hot sauce add freshness and extra kick.
- Beverage pairings: A crisp white wine, iced tea, or a local craft beer complements the smoky, savory flavors.
- Accompaniments: Light green salads or pickled vegetables help balance the richness of the beans.
Make It Your Own: Customizing Flavors
One of the joys of Red Beans and Rice is its flexibility. Customize it to fit your taste:
- Adjust spiciness: Increase cayenne pepper, paprika, or hot sauce for a bolder flavor.
- Protein variations: Swap andouille sausage for smoked turkey, ham, or even vegan sausage.
- Vegetable add-ins: Okra, tomatoes, or bell peppers add extra texture and nutrients.
- Creaminess: Mash a portion of the beans or add a splash of cream for an extra rich texture.
Cottage Cheese Ranch Dip
Find more quick and easy recipes.
Leftovers and Storage Tips
- Store in an airtight container in the fridge for up to 5 days.
- Freeze in portions for up to 3 months.
- Reheat gently on the stove with a splash of water or broth to restore the original consistency.
Pro Tip: Leftovers often taste even better the next day as the flavors have more time to meld.
Conclusion: A Dish That Brings People Together
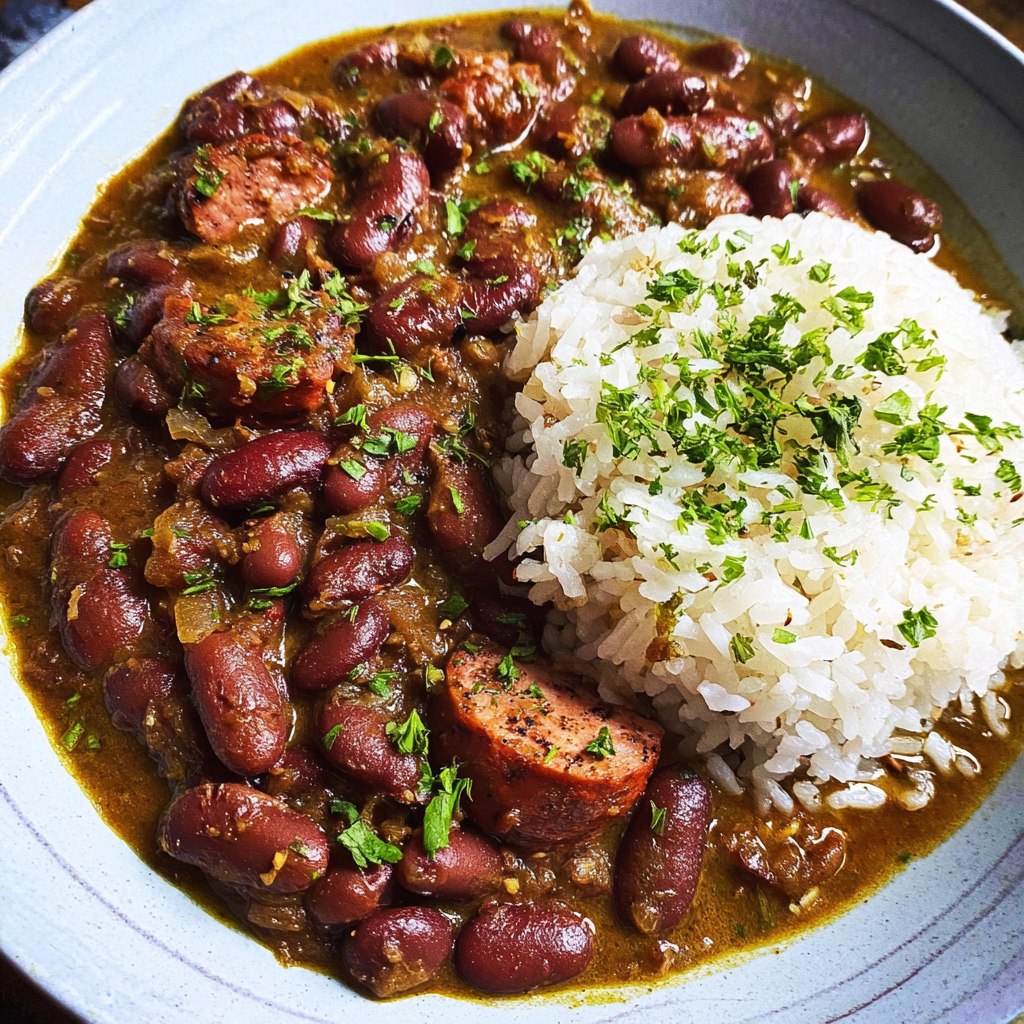
Louisiana Red Beans and Rice is more than a classic Southern recipe—it’s a celebration of culture, history, and family traditions. Whether you’re a seasoned cook or trying it for the first time, this dish offers:
- Hearty, comforting flavors
- Versatile and easy to customize
- A taste of New Orleans history in every bite
By following the traditional methods and embracing your personal twists, you can enjoy a truly authentic taste of Louisiana right at home. So gather your ingredients, simmer slowly, and experience why this dish has been a cherished part of Southern cuisine for generations.
Bonus Tips for Maximum Flavor
- Use quality smoked meats for depth.
- Always include the holy trinity: onion, bell pepper, celery.
- Let the dish rest before serving for maximum flavor infusion.
- Serve over fluffy, long-grain white rice to soak up the delicious sauce.
With these final touches, your Louisiana Red Beans and Rice is ready to impress both family and friends, bringing a true taste of New Orleans into your kitchen.

Creamy Garlic Shrimp: A Luxurious 20-Minute Dinner
Introduction
If you’re craving something rich, comforting, and easy to prepare, few dishes deliver like creamy garlic shrimp. This recipe pairs tender, juicy shrimp with a velvety garlic-infused cream sauce that feels gourmet yet takes less than 20 minutes to make.
One of the best things about shrimp is their nutritional profile. They’re not just delicious—they’re also packed with protein, vitamins, and minerals. According to health benefits of shrimp, this seafood is low in calories, making it a perfect indulgence that doesn’t weigh you down.
But before you dive into the kitchen, it’s worth knowing how to properly handle shrimp. Safe preparation ensures the freshest flavor and the best texture. The safe shrimp handling guidelines provided by the FDA are a great starting point, especially if you’re working with raw or frozen shrimp.
Avocado, Mozzarella, and Tomato Grilled Cheese
Explore more quick and easy grilling recipes.
Why You’ll Love Creamy Garlic Shrimp
This dish is popular not only because it’s quick to make, but also because it offers:
- Juicy shrimp coated in a silky sauce
- A flavor-packed combination of garlic, butter, and cream
- Versatility: pair with pasta, rice, or even bread
- A restaurant-quality dinner in under 20 minutes
Key Ingredients for Creamy Garlic Shrimp
One of the best things about creamy garlic shrimp is that it comes together with a handful of everyday ingredients. Each one plays a unique role in building that perfect balance of rich, savory, and aromatic flavors. Here’s what you’ll need:
🦐 Shrimp
The star of the dish.
- Best choice: Large or jumbo shrimp for meaty, satisfying bites.
- Fresh vs. frozen: Fresh shrimp offer the best texture, but frozen works just as well if thawed properly.
- Preparation tips: Always peel and devein shrimp before cooking. Leave the tail on if you want a restaurant-style presentation.
- Pro tip: Pat shrimp dry before cooking—this helps them sear nicely instead of steaming in the pan.
🧄 Garlic
The heart of the flavor.
- Use fresh garlic cloves for maximum aroma and taste.
- Mince finely for even cooking, or slice thinly for a slightly milder, sweeter garlic flavor.
- For a softer, nuttier taste, try roasted garlic instead of raw.
- Garlic not only elevates the dish but also provides antioxidants and immune-boosting benefits.
🥛 Cream
The key to that silky, luxurious sauce.
- Heavy cream is the traditional choice, giving a rich and velvety finish.
- For a lighter option, substitute with half-and-half or even evaporated milk.
- For dairy-free versions, coconut cream works beautifully and adds a subtle sweetness.
- Always simmer cream gently—high heat can cause it to curdle.
🧈 Butter & Olive Oil
A flavorful cooking base.
- Butter provides richness and enhances the creamy texture.
- Olive oil prevents butter from burning at higher heat.
- Together, they create a balanced fat profile for sautéing garlic and shrimp.
🧀 Parmesan Cheese
The secret to a deeper flavor.
- Freshly grated Parmesan melts smoothly into the sauce and adds a salty, nutty kick.
- Avoid pre-grated cheese—it contains anti-caking agents that can make the sauce grainy.
- For variations, try Pecorino Romano or Asiago cheese.
🌿 Seasonings & Herbs
The finishing touches that brighten the dish.
- Fresh parsley for color and freshness.
- Paprika or cayenne pepper for a touch of spice.
- Lemon juice to cut through the richness and enhance the shrimp’s natural sweetness.
- A pinch of salt and freshly cracked black pepper to balance the flavors.
🍄 Optional Add-Ins
Customize your creamy garlic shrimp with extra textures and flavors:
- Sautéed mushrooms for an earthy bite.
- Spinach for a healthy, colorful addition.
- Sun-dried tomatoes for a Mediterranean twist.
- A splash of white wine for depth in the sauce.
✅ Why These Ingredients Work Together
- Shrimp brings juicy, lean protein.
- Garlic and cream create a luxurious sauce base.
- Parmesan and butter provide rich umami flavor.
- Herbs, lemon, and spices add brightness and balance.
Creamy Asiago Chicken & Gnocchi
Discover more low-carb dinner options.
The result? A dish that’s indulgent yet simple, with layers of flavor in every bite.
Step-by-Step Recipe for Creamy Garlic Shrimp
Making creamy garlic shrimp at home is surprisingly quick and straightforward. In just 20 minutes, you can have a restaurant-quality meal ready to serve. Follow this detailed step-by-step recipe for the perfect balance of juicy shrimp and silky garlic sauce.
📝 Ingredients Recap
Before you start, make sure you’ve got everything ready:
- 1 lb (450 g) large shrimp, peeled and deveined
- 3–4 fresh garlic cloves, minced
- 2 tbsp butter + 1 tbsp olive oil
- 1 cup heavy cream (or half-and-half for lighter version)
- ½ cup freshly grated Parmesan cheese
- Salt and pepper to taste
- 1 tbsp chopped parsley
- ½ tsp paprika or chili flakes (optional)
- Juice of ½ lemon
🔪 Step 1: Prepare the Shrimp
- Rinse shrimp under cold water and pat dry with a paper towel.
- Lightly season with salt, pepper, and a sprinkle of paprika for a subtle smoky kick.
- Optional: Marinate shrimp in olive oil and garlic for 10 minutes to intensify flavor.
🍳 Step 2: Sauté the Shrimp
- Heat 1 tbsp olive oil and 1 tbsp butter in a large skillet over medium-high heat.
- Add shrimp in a single layer—avoid overcrowding.
- Cook for 1–2 minutes per side until they turn pink and opaque.
- Remove shrimp from the skillet and set aside on a plate. (They’ll finish cooking in the sauce later.)
🧄 Step 3: Build the Garlic Base
- In the same skillet, add the remaining butter.
- Toss in the minced garlic and sauté for 30–60 seconds until fragrant.
- Be careful: garlic burns quickly, so keep the heat moderate.
🥛 Step 4: Make the Cream Sauce
- Deglaze the pan with a splash of chicken broth or white wine (optional but adds depth).
- Pour in the heavy cream and stir gently.
- Simmer on low heat for 3–4 minutes, allowing the sauce to thicken naturally.
- Stir in the Parmesan cheese until melted and smooth.
🦐 Step 5: Combine Shrimp and Sauce
- Return the cooked shrimp to the skillet.
- Toss well to coat each piece in the creamy garlic sauce.
- Simmer for another 1–2 minutes to let flavors meld (but don’t overcook the shrimp).
🌿 Step 6: Finish & Serve
- Squeeze in fresh lemon juice and sprinkle with parsley.
- Taste and adjust seasoning with salt, pepper, or more cheese if needed.
- Serve immediately while hot.
🍽️ Serving Suggestions
Your creamy garlic shrimp pairs beautifully with:
- Pasta (linguine, fettuccine, or spaghetti)
- Steamed jasmine rice or risotto
- Crusty bread to mop up the sauce
- Low-carb sides like zucchini noodles or cauliflower mash
✅ In less than 20 minutes, you’ve created a decadent dish that’s both comforting and elegant. The key is not to overcook the shrimp and to simmer the cream sauce slowly for the perfect consistency.
Variations of Creamy Garlic Shrimp
This recipe is endlessly adaptable:
- Creamy garlic shrimp pasta – Toss with linguine or fettuccine.
- Creamy garlic shrimp with rice – A comforting option for a filling dinner.
- Keto-friendly version – Serve over zucchini noodles or cauliflower rice.
- Mediterranean twist – Add sun-dried tomatoes, olives, and fresh basil.
- Spicy version – Stir in chili flakes or cayenne pepper.
What to Serve with Creamy Garlic Shrimp
Pairing creamy garlic shrimp with the right side dishes makes it even more irresistible. Depending on whether you want a hearty dinner or a lighter meal, here are some excellent options:
- Pasta – Fettuccine, linguine, or spaghetti absorb the sauce beautifully.
- Rice – White rice, jasmine rice, or creamy risotto balance the richness.
- Garlic bread or baguette – Perfect for scooping up extra sauce.
- Fresh salad – A crisp green salad with lemon vinaigrette cuts through the creaminess.
- Low-carb alternatives – Zucchini noodles or cauliflower rice for keto diets.
Cooking Tips & Common Mistakes
Even though creamy garlic shrimp is quick and easy, these tips will help you nail it every time:
- Don’t overcook shrimp – They only need 1–2 minutes per side. Remove once they’re opaque.
- Balance garlic and cream – Too much garlic can overpower the dish; too little makes it bland.
- Prevent curdling – Simmer on low heat and add cream gradually. Avoid high heat once cream is added.
- Use fresh Parmesan – Pre-grated cheese often contains anti-caking agents that affect sauce texture.
Make-Ahead, Storage & Reheating
Like most creamy dishes, creamy garlic shrimp is best served fresh, but you can prepare ahead with these methods:
- Refrigeration – Store leftovers in an airtight container for up to 2 days.
- Freezing – Not recommended, as cream sauces tend to separate. If necessary, freeze shrimp separately and make the sauce fresh.
- Reheating – Gently reheat in a skillet over low heat. Add a splash of cream or broth to restore the sauce’s consistency.
Health & Nutrition Benefits
While this dish is indulgent, it offers plenty of nutrition:
- Shrimp is a high-protein, low-calorie food packed with omega-3s.
- Garlic provides antioxidants and immune-boosting benefits.
- Using half-and-half or light cream reduces calories without sacrificing flavor.
- A serving typically has 350–450 calories depending on portion size.
FAQs about Creamy Garlic Shrimp
What goes well with creamy garlic shrimp?
It pairs wonderfully with pasta, rice, crusty bread, or a fresh salad for balance.
How do you thicken garlic cream sauce?
Simmer gently until reduced. If needed, whisk in extra Parmesan or a cornstarch slurry.
What type of shrimp is best for this recipe?
Large or jumbo shrimp work best. Choose peeled and deveined shrimp for convenience.
Can I make creamy garlic shrimp ahead of time?
It’s best enjoyed fresh, but you can prepare the sauce separately and quickly cook shrimp before serving.
How do you prevent the sauce from curdling?
Keep the heat low after adding cream, and avoid adding cold cream straight to a hot pan. Temper it first.
Conclusion

Creamy garlic shrimp is the kind of dish that feels luxurious but requires little effort. With juicy shrimp, a velvety sauce, and endless serving options, it’s a recipe worth mastering. Whether you serve it with pasta for a family dinner, rice for comfort, or zucchini noodles for a low-carb twist, it’s always a hit.
Next time you need a quick, impressive meal, skip the takeout and whip up this homemade classic—it’s comfort food with a touch of elegance.

Spicy Chorizo Pizza: A Bold Twist on a Classic Favorite
Introduction
If you’re craving a pizza that brings the heat, the spicy chorizo pizza is your answer. Loaded with smoky sausage, bubbling cheese, and a fiery kick, this recipe takes traditional pizza to a whole new level. It’s not just about spice—it’s about layers of bold flavors that balance perfectly on a crispy crust.
The roots of chorizo stretch back centuries, with strong ties to Spanish and Mexican culinary traditions. In Spain, it’s cured, smoky, and often flavored with paprika, while in Mexico, it’s fresh, spiced differently, and usually cooked before eating. Understanding these differences is essential if you want to unlock the real magic of spicy chorizo pizza. (Learn more about the history of Spanish chorizo and how it evolved across cultures.)
But this isn’t just about the sausage. When paired with a blistered crust, rich sauce, and gooey cheese, the spicy chorizo pizza becomes more than dinner—it becomes a dining experience. If you want to take your skills even further, check out these expert pizza baking tips for perfecting every detail.
Just like adventurous rolls such as the spicy sushi roll inspiration, this pizza delivers a combination of heat and savory depth that keeps you coming back for more.
What Is Chorizo?
Before diving into the recipe, let’s talk about chorizo.
- Spanish Chorizo: A cured, firm sausage flavored heavily with paprika. It can be sliced thin like pepperoni.
- Mexican Chorizo: A fresh, raw sausage with chili peppers, garlic, and vinegar. It’s usually cooked before being added to dishes.
Why does chorizo work so well on pizza? It’s the balance of smoky, spicy, and savory. Combined with mozzarella and a tangy tomato base, the flavors meld into something unforgettable.
Nutritionally, chorizo is high in protein but also rich in fat and sodium, so it’s best enjoyed in moderation—or balanced with lighter toppings like vegetables.
Key Ingredients for Spicy Chorizo Pizza
When it comes to crafting the ultimate spicy chorizo pizza, the ingredients you choose make all the difference. Each component—whether it’s the dough, sauce, cheese, or toppings—plays a role in balancing heat, smokiness, and richness. Below is a breakdown of the essential and optional ingredients to help you create a pizza that’s bursting with bold flavor.
When it comes to cheese, mozzarella is classic, but manchego brings a nutty sharpness. If you love melty comfort food, this spicy chorizo pizza shares that same gooey charm as an avocado mozzarella tomato grilled cheese.
1. The Dough – The Foundation of Your Pizza
The crust is the canvas for your masterpiece. A light, airy dough with a crisp bottom allows the toppings to shine without becoming soggy.
- Homemade Dough: Best for control over thickness, texture, and flavor. A mix of bread flour, yeast, water, olive oil, and salt creates a chewy yet crispy base.
- Store-Bought Dough: A convenient option if you’re short on time, but look for one with higher hydration (more water content) for better rise.
- Alternative Bases: Whole wheat dough, cauliflower crust, or flatbreads for healthier or gluten-free versions.
Pro tip: Preheat your pizza stone or cast iron pan before baking for a perfectly crispy crust.
2. The Sauce – Adding Tang and Spice
The sauce sets the flavor tone of the pizza. With chorizo being bold and smoky, the right sauce balances its richness.
- Classic Tomato Sauce: Simmered with garlic, onion, and basil.
- Spicy Marinara: Enhanced with chili flakes or hot paprika to match the sausage’s heat.
- Roasted Red Pepper Base: Adds sweetness and smokiness for depth.
Tip: Avoid overly sweet sauces—they can clash with the savory spice of chorizo. Instead, aim for acidity and mild sweetness to cut through the fat.
3. The Cheese – Gooey Meets Sharp
Cheese is the element that ties everything together. The creaminess balances the bold spice of chorizo.
- Mozzarella: The classic choice, offering the best melt and stretch.
- Manchego: A Spanish cheese with nutty, sharp notes that echo the origins of chorizo.
- Cheddar Blend: Sharpness that complements smoky flavors.
- Optional Extras: Goat cheese or feta for tang, provolone for creaminess.
For best results, use a combination: mozzarella as the base for melting and a sharper cheese like manchego sprinkled on top.
4. The Chorizo – The Star Ingredient
No spicy chorizo pizza is complete without its namesake ingredient. The type of chorizo you use greatly impacts the flavor:
- Spanish Chorizo: A cured, firm sausage with a smoky paprika backbone. Slice it thin like pepperoni.
- Mexican Chorizo: Fresh, uncooked, and crumbly. Cook before adding to avoid grease and achieve a rich, spicy bite.
- Turkey or Plant-Based Chorizo: Lighter alternatives for a healthier or vegetarian-friendly pizza.
Whichever you choose, make sure it’s high-quality. Cheap chorizo tends to be greasy and overly salty. Pre-cook fresh versions and drain excess fat to keep your pizza crisp.
5. Optional Toppings – Customize Your Heat
To elevate your spicy chorizo pizza, consider bold toppings that complement the heat:
- Jalapeños or chili flakes for added spice
- Red onions for sweetness
- Roasted peppers for smokiness
- Arugula for a peppery finish
- Pineapple for sweet-heat contrast
The right toppings turn your pizza into a gourmet experience.
Step-by-Step Recipe

Making a spicy chorizo pizza at home is easier than you might think. With just a few fresh ingredients and the right method, you’ll get a restaurant-quality pie that delivers bold flavor and a perfectly crispy crust. Follow these detailed steps to craft your pizza from scratch:
1. Prepare the Dough
The dough is the heart of your pizza. Start by choosing your base:
- Homemade Dough: Combine bread flour, yeast, warm water, olive oil, and salt. Let it rise for 1–2 hours until doubled in size.
- Store-Bought Dough: A great shortcut, but let it rest at room temperature for 20–30 minutes before stretching.
- Shaping: Lightly flour your work surface, then stretch the dough with your hands (avoid rolling pins to keep air bubbles intact).
Pro tip: Thinner dough gives a crisp base, while thicker dough yields a chewy bite.
2. Make the Sauce
A rich, tangy sauce balances the smokiness of chorizo.
- Heat olive oil in a pan.
- Add chopped onions and garlic, cooking until fragrant.
- Stir in crushed tomatoes, oregano, and a pinch of chili flakes.
- Simmer for 15 minutes, letting flavors meld.
For extra depth, roast tomatoes and red peppers before blending them into the sauce. This smoky-sweet base pairs beautifully with the heat of the chorizo.
3. Cook the Chorizo
If you’re using Mexican chorizo (fresh and uncooked), it must be cooked before topping:
- Heat a skillet over medium heat.
- Break the sausage into crumbles and cook until browned, about 6–8 minutes.
- Drain excess fat to avoid a greasy pizza.
If you’re using Spanish chorizo (cured and firm), no pre-cooking is required. Simply slice it thin like pepperoni.
Pro tip: For added flavor, sauté your chorizo with diced onions or peppers. This step infuses even more smokiness into the topping.
4. Assemble the Pizza
Now it’s time to put everything together:
- Preheat your oven to 475°F (245°C). If you have a pizza stone, place it inside while preheating.
- Place stretched dough on parchment paper or a lightly oiled baking sheet.
- Spread an even layer of sauce across the base—avoid overloading.
- Add cheese next (mozzarella for stretch, manchego for sharpness).
- Top with cooked or sliced chorizo.
- Layer on optional toppings: jalapeños, roasted peppers, red onions, or arugula.
Keep toppings balanced—too much moisture can make the crust soggy.
5. Bake to Perfection
Transfer the pizza to your preheated oven (or pizza stone) and bake for 10–12 minutes. Look for:
- A golden-brown crust with slight blistering
- Bubbling, melted cheese
- Slightly crisped chorizo edges
For extra char, switch to broil mode for the last 1–2 minutes.
6. Serve and Enjoy
Remove from the oven and let the pizza cool for 2–3 minutes before slicing. Garnish with fresh arugula, cilantro, or a drizzle of chili oil. Serve hot with a side of salad, sangria, or garlic bread.
Variations of Spicy Chorizo Pizza
Want to get creative? Try these twists:
- Sweet & Spicy: Add pineapple for a sweet balance.
- White Pizza: Skip the tomato sauce, use garlic cream or ricotta as the base.
- Mexican Fusion: Top with jalapeños, cilantro, cotija cheese, and a lime squeeze.
- Gourmet Upgrade: Add caramelized onions, manchego cheese, and a drizzle of truffle oil.
For something portable, turn this into calzones or stuffed pockets. Fans of handheld cheesy bites will love experimenting with pizza pocket recipes.
Cooking Tips & Expert Hacks
- Avoid grease: Cook and drain fresh chorizo before topping.
- Cheese layering: Place cheese under the sausage to prevent burning.
- Balance spice: Add cooling toppings like avocado or sour cream.
- Crispy crust trick: Preheat your pizza stone or cast iron pan for maximum crunch.
To elevate your pizza, consider toppings like jalapeños. For even more zing, drizzle it with a creative jalapeño sauce idea that balances sweet and spicy notes.
Nutritional Breakdown
On average, a slice of spicy chorizo pizza (with standard toppings) has:
- Calories: ~250–300 per slice
- Protein: 12–15g
- Carbs: 25–30g
- Fat: 12–15g
- Sodium: High (thanks to chorizo and cheese)
Healthier swaps:
- Whole wheat crust
- Reduced-fat mozzarella
- Turkey or plant-based chorizo
Serving Ideas & Pairings
Pair your spicy chorizo pizza with:
- Sides: Garlic bread, Caesar salad, roasted vegetables
- Drinks: Spanish red wine, sangria, or craft beer
- Occasions: Game nights, family dinners, tapas-style parties
Pair your spicy chorizo pizza with sides like garlic bread or a fresh salad. If you’re in the mood for something heartier, try a flavorful Cajun side dish to complement the smoky spice.
(Pro tip: Check out this guide on pairing wine with spicy food to elevate your experience.)
FAQs About Spicy Chorizo Pizza
What cheese goes best with chorizo pizza?
Mozzarella is classic, but manchego adds Spanish authenticity.
Should I cook chorizo before putting it on pizza?
Yes, if it’s fresh Mexican chorizo. Spanish cured chorizo can go on raw.
What toppings pair best with spicy chorizo?
Jalapeños, onions, peppers, mushrooms, or sweet pineapple.
Can I make it vegetarian?
Yes, use plant-based chorizo or spiced soy crumbles.
How do I make the crust extra crispy?
Bake on a preheated pizza stone at high heat.
What’s the difference between pepperoni and chorizo?
Pepperoni is American, spicier in a different way, and less smoky than Spanish chorizo.
Conclusion

The spicy chorizo pizza is more than just another topping variation—it’s a bold, fiery twist on a timeless classic. Whether you stick with traditional Spanish flavors or experiment with Mexican-inspired toppings, this dish delivers flavor in every bite.
So next time you’re craving pizza night, forget the usual pepperoni and try something adventurous. With just a few ingredients, you’ll have a homemade masterpiece that’s guaranteed to impress.

Red Lentil Pancakes: A Healthy, Protein-Packed Breakfast Alternative
If you’re looking for a nutritious, gluten-free, and vegan alternative to traditional pancakes, red lentil pancakes are a perfect choice. Packed with protein, fiber, and essential nutrients, these pancakes are versatile enough to serve for breakfast, lunch, or dinner. Whether you enjoy them sweet with fruits or savory with spices and vegetables, this recipe is a delightful and wholesome addition to your meal rotation.
What Are Red Lentil Pancakes?
Red lentil pancakes, also known as masoor dal chilla in Indian cuisine, are made from soaked and blended red lentils cooked on a skillet until golden and fluffy. They are similar in texture to South Indian dosas but can be enjoyed in a variety of ways depending on your preference.
You can explore a detailed recipe for red lentil pancakes on Enara Health, which breaks down step-by-step instructions to ensure perfect results every time. For more tips on creating a nutritious and fluffy batter, check out Lazy Cat Kitchen’s guide for added inspiration.
Nutritional Benefits of Red Lentil Pancakes
These protein-rich pancakes are not just delicious—they’re also incredibly healthy. Here’s why:
- High in protein: Red lentils are an excellent source of plant-based protein, which supports muscle repair and growth.
- Rich in fiber: The fiber content promotes healthy digestion and keeps you feeling full longer.
- Packed with micronutrients: Red lentils provide essential nutrients such as iron, magnesium, and B vitamins.
- Low glycemic index: Ideal for those managing blood sugar levels.
For more detailed instructions and tips, check out our Coconut Cream Pancakes.
Adding vegetables or herbs can further boost the nutritional profile and flavor of your pancakes.
Essential Ingredients
To make the perfect red lentil pancakes, using the right ingredients is crucial. These ingredients not only ensure the right texture and taste but also contribute to the nutritional value of the dish. Below is a detailed breakdown of both primary and optional ingredients.
Primary Ingredients
- Red Lentils (Masoor Dal)
Red lentils are the star ingredient in these pancakes. They are naturally gluten-free, high in plant-based protein, and rich in fiber and essential micronutrients like iron and magnesium. When soaked and blended, they create a smooth batter that cooks into soft, fluffy pancakes. Always choose split red lentils for a finer texture. - Water
Water is used to soak the lentils and to adjust the consistency of the batter. The right amount of water ensures that the batter is pourable but not too thin, which helps create pancakes that hold their shape and cook evenly. - Salt
A pinch of salt enhances the natural flavors of the lentils and balances the taste of the batter. For those preferring low-sodium diets, reduce or substitute with a salt alternative. - Optional Spices
To enhance the flavor profile of your pancakes, you can add:- Turmeric: Adds a warm color and subtle earthy flavor.
- Cumin: Gives a mild, nutty aroma that pairs well with savory fillings.
- Chili Powder: For a subtle heat that complements savory pancakes.
Optional Add-Ins
Adding vegetables, herbs, or flours can transform your pancakes and boost their nutritional value and texture.
- Vegetables:
- Finely chopped spinach, carrots, zucchini, or onions can be added to the batter. They not only improve the taste but also increase the fiber content and vitamin intake.
- Grated vegetables cook quickly and integrate seamlessly into the pancakes without making them soggy.
- Fresh Herbs:
- Cilantro, parsley, or mint add freshness and bright flavor.
- Herbs can also help improve digestibility and add antioxidants.
- Flours:
- A small amount of chickpea flour or rice flour can help thicken the batter if needed.
- Flours are particularly useful if the lentils were over-soaked or the batter is too watery.
- Optional Protein Boosters:
- Tofu, tempeh, or plant-based cheese can be folded in for extra protein.
- Seeds like chia or flaxseed can also be added for omega-3s and texture.
Notes for Ingredient Selection
- Organic Ingredients: Choosing organic red lentils and vegetables ensures that you are consuming a clean, chemical-free meal.
- Freshness Matters: Use fresh spices and herbs for the most aromatic and flavorful pancakes.
- Soaking Time: Soak lentils for at least 3–4 hours (or overnight) to ensure a smooth batter and easy digestion.
By carefully selecting and combining these ingredients, you can create red lentil pancakes that are not only delicious but also highly nutritious, satisfying, and versatile. For more ideas and variations, you can check Lazy Cat Kitchen’s guide to red lentil pancakes or the Enara Health recipe.
Step-by-Step Recipe

Making red lentil pancakes might seem intimidating at first, but with a clear step-by-step process, you can achieve soft, fluffy, and flavorful pancakes every time. Follow these instructions to master this healthy, protein-packed, and gluten-free dish.
1. Soaking the Lentils
- Measure 1 cup of red lentils (masoor dal) and rinse them under cold water until the water runs clear.
- Place the rinsed lentils in a large bowl and cover them with 2–3 cups of water.
- Soak for 3–4 hours, or ideally overnight. Soaking softens the lentils, making them easier to blend and digest.
- Tip: Soaking overnight will give you the smoothest batter and help your pancakes cook evenly.
2. Preparing the Batter
- Drain the soaked lentils and rinse again.
- Transfer the lentils to a blender and add 1 cup of fresh water.
- Add salt and any desired spices, such as:
- Turmeric for color and subtle earthy flavor
- Cumin for a warm, nutty aroma
- Chili powder for a mild heat
- Blend until the mixture becomes a smooth, thick batter. The batter should be pourable but not runny.
- Tip: If the batter is too thick, add water a tablespoon at a time to reach the perfect consistency.
For more detailed tips on achieving the ideal batter, you can refer to this Red Lentil Pancakes guide.
3. Adding Optional Ingredients
- Enhance your pancakes by mixing in chopped vegetables like spinach, carrots, or onions.
- Add fresh herbs such as cilantro or parsley for extra flavor.
- Include optional flours like chickpea or rice flour if the batter is too watery.
- For a protein boost, fold in small pieces of tofu or seeds like chia or flaxseed.
4. Cooking the Pancakes
- Heat a non-stick skillet or griddle over medium heat.
- Lightly grease the pan with oil or a non-stick spray.
- Pour a small ladle of batter onto the pan and spread it into a circle about 4–5 inches wide.
- Cook for 2–3 minutes on the first side until the edges start to lift and the bottom turns golden brown.
- Flip carefully using a spatula and cook for another 2–3 minutes on the other side.
- Repeat this process with the remaining batter, adjusting heat as needed to avoid burning.
- Tip: Keep cooked pancakes warm in a low oven while preparing the rest of the batch.
5. Serving Suggestions
- Serve red lentil pancakes immediately for the best texture.
- Savory options: Pair with chutney, sautéed vegetables, or a vegan yogurt dip.
- Sweet options: Top with fresh fruits, maple syrup, or a sprinkle of cinnamon.
- Garnish with fresh herbs for visual appeal and added flavor.
6. Storage Tips
- Refrigeration: Store in an airtight container for up to 3 days.
- Freezing: Place pancakes between parchment paper in a freezer-safe container for up to 2 months.
- Reheating: Warm in a skillet or microwave before serving to maintain softness and flavor.
By following this detailed process, you’ll achieve perfectly fluffy, nutritious, and delicious red lentil pancakes every time.
For a more detailed guide with tips and tricks, see the Lazy Cat Kitchen recipe.
Flavor Variations
One of the best things about red lentil pancakes is their versatility. You can easily customize the flavor to suit your taste, whether you prefer sweet, savory, or stuffed pancakes.
Sweet Variations
- Add cinnamon, vanilla extract, or cocoa powder to the batter for a dessert-style pancake.
- Top with fresh fruits, such as bananas, berries, or mango slices, for natural sweetness.
- Drizzle with maple syrup or agave nectar to make a wholesome, indulgent breakfast.
Savory Variations
- Mix in spices like cumin, turmeric, coriander, or a pinch of chili powder for depth of flavor.
- Add chopped onions, spinach, grated carrots, or bell peppers to create a nutrient-packed, savory option.
- Serve with chutney, vegan yogurt, or sautéed vegetables for a satisfying meal.
Stuffed Pancakes
- Fill with spiced tofu, mashed potatoes, or sautéed vegetables for a hearty and filling version.
- Roll or fold the pancake to encase the filling, creating a portable and protein-rich snack.
By experimenting with these variations, you can make red lentil pancakes for breakfast, lunch, dinner, or even a healthy snack, keeping your meals exciting and flavorful.
For more recipes and ideas, explore our Gingerbread Waffles
Tips for Perfect Pancakes
To ensure your pancakes turn out fluffy and delicious:
- Batter consistency: Adjust water to achieve a smooth but thick batter.
- Pan temperature: Preheat your skillet for even cooking.
- Batch cooking: Cook pancakes in batches and keep warm in the oven.
Common Mistakes to Avoid
- Under-soaking lentils: Leads to a gritty texture.
- Over-blending batter: Can result in pancakes that are too thin.
- Uneven cooking: Causes pancakes to burn or stay raw in the center.
Storing and Reheating
- Storage: Store cooked pancakes in an airtight container in the refrigerator for up to 3 days.
- Freezing: Freeze pancakes between layers of parchment paper for up to 2 months.
- Reheating: Warm in a skillet or microwave before serving.
FAQs
Q: Can I use other lentils?
A: Yes, but red lentils blend smoothly and cook faster than other types.
Q: Are these pancakes suitable for diabetics?
A: Yes, they have a low glycemic index, making them a diabetic-friendly option.
Q: Can I make them without soaking?
A: Soaking is recommended for better digestibility and texture.
Serving Suggestions
- Toppings: Fresh fruits, nuts, maple syrup, or vegan yogurt.
- Sides: Pair with a fresh salad or vegetable curry.
- Beverages: Herbal tea, fresh juice, or almond milk.
Conclusion

Red lentil pancakes are a delicious, healthy, and versatile option for anyone looking to boost their plant-based protein intake. With endless flavor variations and easy preparation, they are a must-try for breakfast, brunch, or a wholesome snack. Experiment with different spices, fillings, and toppings to make them your own, and enjoy the benefits of this nutrient-packed, gluten-free dish.