
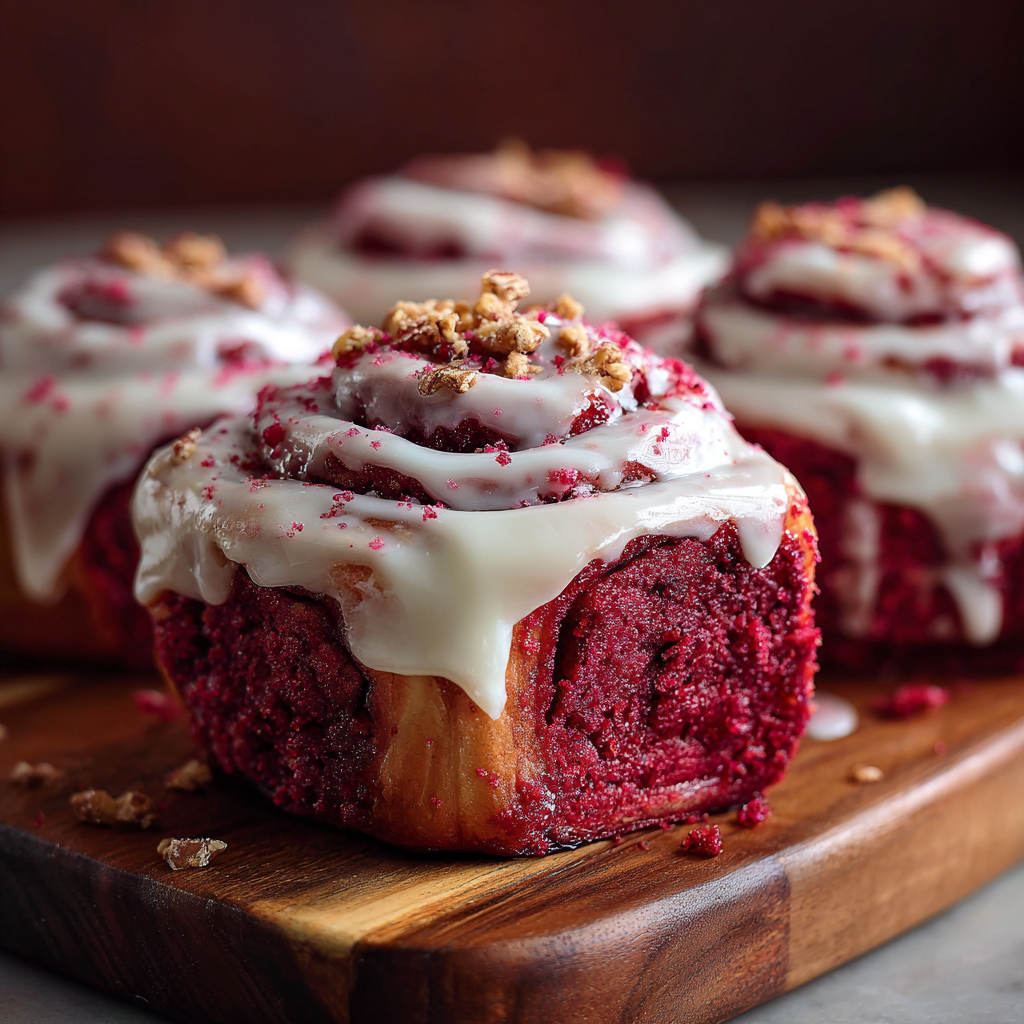
There’s something undeniably indulgent about red velvet. Pair that with the gooey, buttery comfort of cinnamon rolls and you’ve got a breakfast or dessert that’s both nostalgic and novel. Red velvet cinnamon rolls are more than just eye candy—they’re rich, chocolaty, and blanketed in luscious cream cheese frosting. Whether it’s for a weekend brunch, Valentine’s Day, or just a cozy Sunday morning, these rolls are sure to impress.
Before we dive into the step-by-step guide, let’s understand why this unique twist is worth baking at home.
What Makes Red Velvet Special?
The term red velvet describes more than just color—it’s about texture. Originating from classic American baking, red velvet cake is known for its soft, tender crumb, subtle cocoa flavor, and mild tang. The vibrant red hue originally came from natural cocoa and vinegar reactions, though nowadays most recipes include red food coloring for visual impact.
While you can buy pre-mixed versions, making your dough from scratch delivers unmatched flavor and fluffiness. Not sure how to handle yeast doughs? Here’s a fantastic guide to yeast baking from King Arthur Baking that breaks it down perfectly.
Why Add Red Velvet to Cinnamon Rolls?
You’re combining two fan favorites here: velvety cocoa-kissed dough and a classic cinnamon swirl. These rolls:
- Stand out visually with a rich red hue.
- Offer a slightly chocolatey twist without overpowering the cinnamon.
- Pair wonderfully with a cream cheese glaze, adding tang to balance the sweetness.
Want to make that frosting ultra-smooth and luscious? Check out this expert cream cheese frosting guide by Serious Eats for insider tips.
🧈 Ingredients That Make It Work
The magic of red velvet cinnamon rolls lies in the perfect combination of ingredients that create their signature texture, flavor, and appearance. While the base recipe is similar to traditional cinnamon rolls, several key additions and tweaks make these rolls truly stand out.
🧴 Red Food Coloring
The most iconic element of red velvet is, of course, the vibrant red hue. This comes from using liquid or gel red food coloring. While not essential for flavor, it provides the unmistakable visual appeal. Gel coloring is more concentrated, so you’ll need less to achieve the same effect.
🍫 Cocoa Powder
Unlike chocolate rolls, red velvet uses just a hint of cocoa—typically about ½ cup. This gives the dough a gentle chocolate undertone without overpowering the cinnamon filling. Always opt for natural cocoa powder (not Dutch-processed) for the best color and flavor reaction.
🧈 Enriched Dough Base
What sets cinnamon rolls apart from basic bread is the rich, tender dough. This version includes:
- Whole milk – adds moisture and softness
- Butter – contributes richness
- Eggs – give structure and tenderness
- Sugar – lightly sweetens the dough
Together, these create a dough that’s pillowy soft and flavorful.
🍯 Brown Sugar Cinnamon Filling
The filling brings deep, caramelized flavor with:
- Dark brown sugar
- Ground cinnamon
- A touch of nutmeg
- Melted butter
This sweet-spiced mix is what gives cinnamon rolls their classic swirl of gooey deliciousness.
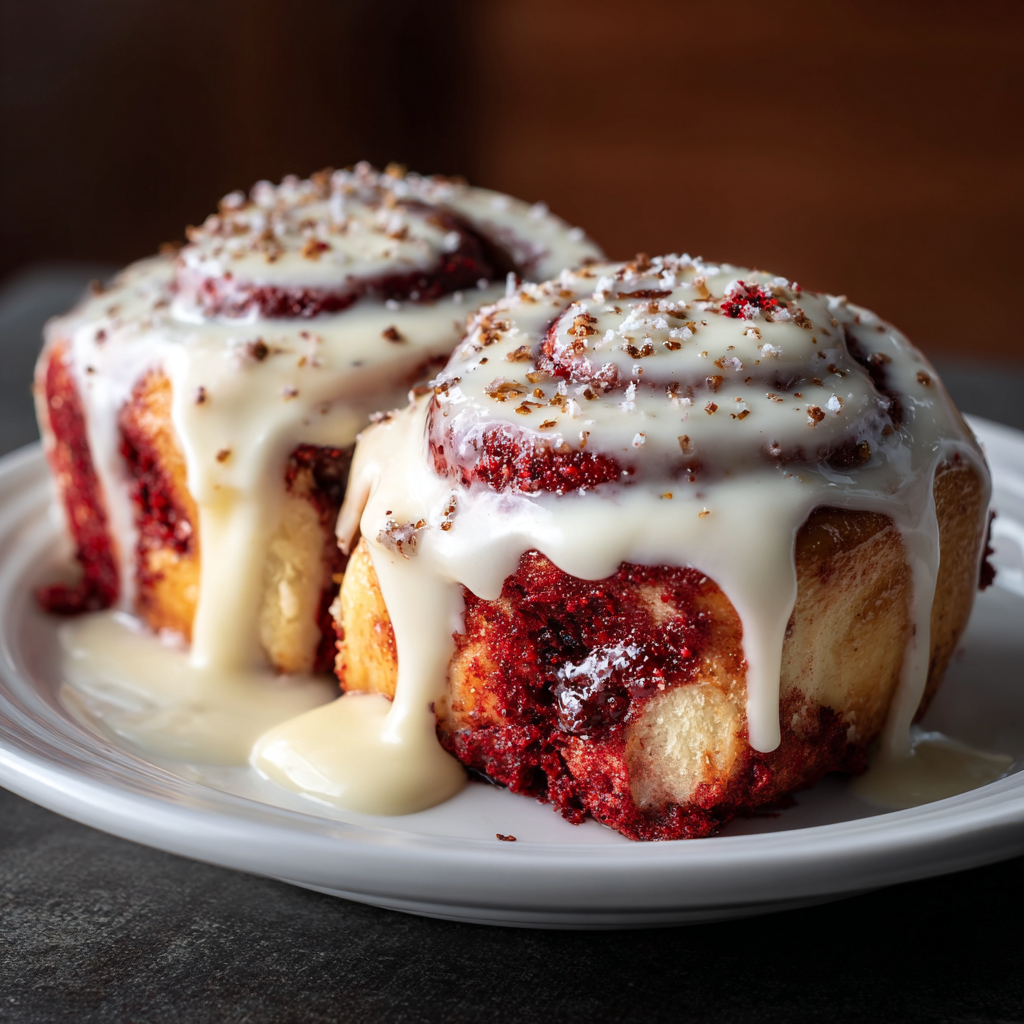
🧊 Cream Cheese Frosting
No red velvet recipe is complete without cream cheese frosting. It adds a tangy contrast to the sweet filling and complements the cocoa flavor beautifully. Don’t skip it—it’s what ties the entire flavor profile together.
Each ingredient plays a vital role in making these rolls moist, flavorful, and visually stunning. Together, they deliver the ultimate homemade treat.
🧰 Essential Tools
Before you dive into baking your delicious red velvet cinnamon rolls, it’s important to have the right tools on hand. Using the proper equipment makes the process smoother, more enjoyable, and increases your chances of achieving bakery-quality results at home. Here’s what you’ll need — and why each item matters.
🌀 Stand Mixer with Dough Hook
While not absolutely necessary, a stand mixer makes mixing and kneading yeast dough much easier. The dough hook attachment develops gluten effectively, ensuring your rolls are soft, fluffy, and perfectly elastic. If you don’t have a mixer, you can knead by hand, but expect it to take 10–15 minutes.
🍞 9×13” Baking Dish
This size is ideal for spacing 12 rolls snugly, allowing them to rise and bake evenly. A glass or ceramic dish works best for even heat distribution. Line it with parchment paper for easy removal and cleanup.
🧱 Rolling Pin
Rolling your dough into an even rectangle (about 18×12 inches) is essential for evenly sized rolls and consistent swirls. A wooden or silicone rolling pin gives you more control and prevents sticking.
✂️ Sharp Knife or Unflavored Dental Floss
To cut the rolls cleanly without squashing them, use a very sharp knife or, even better, unflavored dental floss. Slide it under the dough log, cross the ends, and pull to slice through cleanly.
🌡️ Thermometer (Optional but Helpful)
An instant-read thermometer helps check internal doneness. Rolls are perfectly baked when the center reaches 185–190°F. This ensures the inside is cooked without overbaking the outer layer.
Having these tools ready will make the process smoother, the result prettier, and your experience far more enjoyable—whether you’re a seasoned baker or just starting out.
👩🍳 Step-by-Step: How to Make Red Velvet Cinnamon Rolls
1. Prepare the Dough
- Warm 1 cup milk (90–100°F) and mix with 1 tsp sugar and 2¼ tsp active dry yeast. Let sit 10 minutes until bubbly.
- Melt 6 tbsp butter, then stir in:
- 1 tbsp red food coloring
- 1 tsp vanilla extract
- In a large bowl or stand mixer, combine:
- Yeast mixture
- Melted butter mixture
- 2 eggs
- ½ cup sugar
- ½ cup cocoa powder
- 1 tsp kosher salt
- 4 cups all-purpose flour
- Knead for 5–7 minutes until elastic. Dough should be soft and slightly tacky.
Tip: Let dough rise in a warm space for 1–1.5 hours or use a proofing setting in your oven if available.
2. Make the Filling
While the dough rises, prepare your cinnamon filling:
- Melt ½ cup unsalted butter
- Stir in:
- ¾ cup dark brown sugar
- 2 tbsp cinnamon
- ½ tsp nutmeg
- ½ tsp salt
Let cool slightly.
3. Roll and Assemble
- Roll dough into an 18×12 inch rectangle.
- Spread filling evenly, leaving a ½-inch border.
- Roll tightly from long edge into a log.
- Slice into 12 rolls.
- Place into greased or parchment-lined 9×13 pan.
Let rise again 45–60 minutes until touching.
4. Bake and Frost
- Preheat oven to 350°F.
- Bake for 27–30 minutes, until tops are dry and slightly golden.
- Optional: Internal temp should read 185–190°F.
Let cool for 10–15 minutes, then spread half the frosting while warm so it melts into the rolls. Add the remaining frosting once cooled.
🍰 Cream Cheese Frosting Perfection
You’ll need:
- 4 oz cream cheese (softened)
- 4 tbsp butter (softened)
- 1 tsp vanilla
- ¼ tsp salt
- 1 cup sifted powdered sugar
Mix until creamy and fluffy. Sifting the sugar prevents lumps.
❄️ Storage, Freezing, and Reheating
Room Temperature
- Store in airtight container for up to 2 days.
Refrigerated
- Up to 7 days, reheat before serving.
Freezing (Baked or Unbaked)
- Freeze individually or as a pan after baking.
- Freeze unbaked rolls after slicing, then thaw overnight and bake.
🌱 Can I Skip the Food Coloring?
Yes. The red is purely aesthetic. Without coloring, you’ll get a lovely chocolate cinnamon roll. Unfortunately, natural dyes like beet juice or powders tend to fade or brown during baking, so artificial coloring is best if color matters to you.
🌀 Creative Variations to Try
Want to put a twist on this recipe?
- Add white chocolate chips to the filling.
- Use raspberry jam for a fruity layer.
- Swap nutmeg for cardamom or pumpkin spice.
- Top with espresso glaze for a mocha-red velvet fusion.
- Add crushed pecans or walnuts for crunch.
🛠 Common Problems and Fixes
Dough not rising?
- Check your yeast freshness.
- Let rise in a warm, draft-free area.
Frosting lumpy?
- Microwave in 10-second bursts until smooth.
- Cool quickly by spreading on a chilled baking sheet, then transfer back to bowl.
Rolls dried out?
- Spread frosting while warm to retain moisture.
❓ FAQ – Red Velvet Cinnamon Roll Questions
Can I use cake mix for the dough?
Yes, but you’ll sacrifice texture and flavor. Scratch-made dough is fluffier and more authentic.
Can I prep them the night before?
Absolutely. You can refrigerate dough after the first rise or shaped rolls. Let them come to room temp before baking.
Do I have to use a stand mixer?
Nope. Hand-kneading takes longer but works just as well.
Is red velvet just chocolate?
Not exactly. It’s a mild cocoa flavor with a slight tang from the buttermilk or vinegar traditionally used in cakes.
How do I keep leftovers soft?
Wrap tightly or store in airtight container. Microwave for 10–15 seconds before serving to refresh.
🏁 Final Thoughts
There’s something magical about a freshly baked cinnamon roll—but when you add the rich, cocoa-kissed flair of red velvet, you get a dessert (or breakfast!) that’s both memorable and irresistibly decadent. These red velvet cinnamon rolls are not just a pretty twist on a classic—they’re packed with flavor, texture, and warmth that feels like a hug from the oven.
One of the best things about this recipe is its versatility. You can keep it simple with the traditional cream cheese frosting and classic swirl, or get creative with additions like chocolate chips, berries, or even espresso glaze. It’s also great for planning ahead—thanks to the overnight and freezer-friendly options, you can have fresh, bakery-style rolls ready for brunch or dessert with minimal last-minute work.
If you’re new to working with yeast doughs, this recipe is a gentle introduction. It’s forgiving, flexible, and full of helpful hacks—like creating a warm proofing environment or using the double-frosting trick to lock in moisture. With a few basic tools and ingredients, even beginner bakers can achieve soft, gooey, bakery-worthy results.
More than just a recipe, red velvet cinnamon rolls are an experience—perfect for holidays, birthdays, Valentine’s Day, or a cozy weekend treat. And while they may look fancy, they’re surprisingly simple to make at home.
So preheat that oven, gather your ingredients, and get ready to enjoy the sweet smell of something truly special. Once you’ve tried them, don’t be surprised if these red velvet beauties become a beloved staple in your baking rotation.
Because really, who can say no to a warm, frosting-covered swirl of joy?